Showing posts with label Recipes. Show all posts

Sunday, August 23, 2015

Adventures in Fundraising - Gourmet Meals for a Year

As some of my readers may know, I am the chairperson for the Mission Campaign for our youth choir, Pueri Cantores St. Bernard of Clairvaux, and my husband is the director.  We are raising money to travel to Rome on December 26 and sing for the New Year's Day Mass of Peace with Pope Francis!  It is a once-in-a-lifetime opportunity for 46 singers, ages 8 through 18, and it's even more special because we will be sharing the experience with 5,000 young singers from every continent!  I get the shivers every time I think of the trip for my 2 kids.

We had some pretty intense fundraising activity last Spring and are gearing up for our last push before we make our final trip payments in mid-October.  We did a number of "basket raffles," and made about $3,000.  As one of our "basket raffles," we raffled off 12 months of homemade gourmet meals, one per month.  Our winner was a nice couple in our parish choir.  I've made several of these meals and although it is a bit of work, it's fun for me.  I wouldn't call my self a gourmet cook by any stretch (don't tell them that!), but I can follow a recipe and enjoy trying new ones.

This month's menu includes:

Cucumber Ginger Sesame Salad
Honey Mustard Chicken
Rice
Garlic Parmesan Mashed Cauliflower
Meyer Lemon Pound Cake
Peach Raspberry Sangria

I've linked two recipes to the items above (none are original to me!).  The other items I found inspiration, but in the end changed them in favor of my own recipe.  One of those was the Cucumber Ginger Sesame Salad:


It's very easy - cucumber, carrots, edamame and toasted sesame seeds.  I used a store bought Asian Sesame dressing.  The best part of this recipe was cutting the cucumber.  Using a potato peeler, I worked around the top of the cucumber to make twists that are so pretty! Before mixing them with the other ingredients, I laid them out to dry a little.  I hate when cucumber salads are watery because of the cucumbers.


These meals are delivered on the third Sunday of every month.  I try to make extra of everything so I can feed my own family as well.  This month I started about 24 hours before delivery with the pound cake and sangria.  I will admit I'm cheating a bit, using a store bought mix. This one is from Krusteaz and if the smell while baking is any indication, this is going to be seriously yummy!


I have always wanted to make sangria, especially a white peach version.  For the fruit, I used 2 yellow peaches and 1 white nectarine with raspberries.  Then I added 1/2 c. of peach schnapps, 1/2 c. of brandy, 2 12 oz cans of 7-Up and 2 bottles of Moscato wine. That will make about 10 good servings of sangria. A good sangria requires at least 8 hours to mix and I'm gave mine 24. And oh, it was worth the wait!


I was also pleased with the Honey Mustard Chicken (see link to recipe above).  I served it over white rice.


Hey, if you appreciate this fundraising suggestion, the recipes or just my blog, we would love your support.  Our YouCaring fund is HERE and even the smallest donations are appreciated!

Cindy

Wednesday, January 8, 2014

Comfortably Catholic

I've been writing "Straddling the Gap" for over two years now and I enjoy writing about crafts, family life and recipes.  As much as I enjoy writing this blog, there is an important part of my life that I don't write about much - my faith.  It's not that I'm hiding it - it permeates my family life - but I don't want to change the focus of Straddling the Gap.  So in 2014, I'm introducing "Comfortably Catholic."

Comfortably Catholic is a blog about my life as a cradle Catholic, and my thoughts on faith, hope and love.  I'm really excited about the new blog and have lots of ideas for things I want to say.  I would love if you would check it out - www.comfortablycatholic.com.

I am a mom, though.  As much as I'm crazy about my new baby, I still fiercely love my older child.  For those of you who don't read code, that means "Straddling the Gap" isn't going anywhere.  I will continue to write about life and my struggle to straddle the gaps between being a working attorney, wife and mother.  I love my crafts and can't wait to show more soon - especially the ones that will be in my Etsy store, Pretty Pretty Cindy.  I'm also testing a few of those internet recipes and cleaning tips, so stay tuned!  If you stick around, I will show you more about my favorite places in my favorite state - Arizona.

Thanks for reading out there - hopefully you've now added another blog to your reading list!

cindy


Wednesday, December 11, 2013

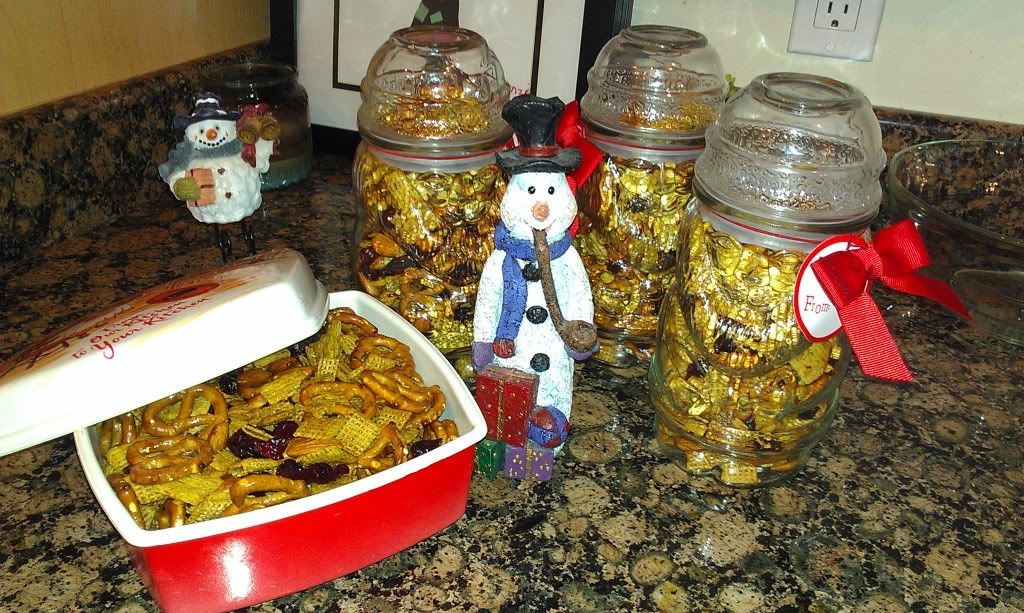
Holiday Snacks - Orange-Cranberry Snacks

This is a recipe I like to repost every year not only because it's good, but also because you can never have too many little gift ideas.


It's getting down to the wire when I've got to think about all the "little" gifts I need - for teachers, babysitters, mailmen, other last minute recipients.  These are my favorite gifts because although I like to make them interesting, I don't necessarily have to give a lot of personal thought to them.  I also like to combine my love for the deal.  Specifically, I like to buy Christmas things right after Christmas for a song and wait and use them the following year.  When I unwrap my Christmas decorations, I enjoy finding something new - like Christmas comes early.  A couple of years ago I found these glass Santa containers on sale for $1.00 each (originally $4.99) at Target.  I thought I would make cookie mix, but because of the small size, I needed to think of something else.

 Cranberry/Orange Snack Mix


The ingredients are pretty simple:

2 c. Corn Chex
2 c. Oat squares
2 c. Mini Pretzels
1 c. whole almonds
1/4 c. butter
1/3 c. frozen orange juice concentrate, thawed
3 Tbl packed brown sugar
1 tsp ground cinnamon
3/4 tsp ground ginger
1/4 tsp allspice
2/3 c. dried cranberries (Craisins)

Preheat oven to 250 degrees and coat a 13X9 inch baking pan with non-stick cooking spray.  Mix the first four ingredients in a large bowl and set aside.  In a smaller bowl melt butter and add orange juice concentrate, brown sugar and spices.  Mix well and pour over the dry ingredients, stirring them to coat. 


 Spread the resulting mix on the baking pan and bake for 50 minutes.  You will need to stir the mix every 10 minutes.  


Once it's done, you add the Craisins and lay the mix out on a flat surface until it's dry.  You can store it in any airtight container.  As an extra bonus, your kitchen will have a wonderful smell of spiced orange and cranberry.  


This is better than any old cookie mix :)

cindy

Tuesday, December 3, 2013

Christmas Snacks - Muddy Buddy Mix


I like this one from last year, so I'm reposting for more holiday yumminess.


If you're looking for a sweet little snack as an alternative to cookies, this one is easy, quick and (seriously) not as messy as making cookies.  This looks just like snow in a bowl.  It's also a change in pace for Santa on Christmas Eve.  (Let's face it - he's tired of cookies at every house!)  This snack is actually good any time of year, so jot down the recipe for later if you're one of those cookie purists.

The dry ingredients are somewhat approximate, just make a big bowl of crunchy stuff and then mix it with the other ingredients.  You need:

1 cup semi-sweet chocolate chips
1/4 cup butter
1/2 cup peanut butter
1 tsp. Vanilla extract
4-5 c. Chex (any flavor(s) you like)
2 c. Mini pretzels
1 c. Powdered sugar


Place first three ingedients and heat in microwave for 1 minute. Mix well and heat more if needed to melt everything. Add vanilla extract and mix well.  Mix dry ingredients (you can also add nuts, M&Ms or anything else).  Pour chocolate mixture over dry ingredients and mix well.  Wait a few minutes for the hot chocolate mixture to cool down a bit  Transfer the mixture into plastic ziplock bags with 1/4 to 1/2 cup of powdered sugar in each, close and shake to coat.  Coat all of mix (adding more powdered sugar as needed).  If you end up with too much powdered sugar or if it is clumping too much to the chocolate covered ingredients, you can use a colander or sifter to reduce the powdered sugar.  Serve or chill to store.

 (I just noticed my pictures look like it's a container full of powdered sugar, but it's my flash adding to much light.  It is coated, but not drowning in powdered sugar!)

Dive in!!

cindy


Saturday, November 30, 2013

Pumpkin Palooza - Pumpkin Cheesecake Swirl Brownies

O.K., by now pumpkin might be getting a little old for most of you, but here's one more recipe I'll throw at you.  The pumpkin taste isn't as prevalent and there are chocolate and cheesecake tastes to boot!   I will admit that instead of being a purist by making the homemade portion of these brownies, I took the easy way out and used a box brownie mix and kept the recipe limited to the yummy pumpkin cheesecake topping.  Without further delay, here is the recipe for Pumpkin Cheesecake Swirl Brownies from Table for Two Blog:


Ingredients:

1 box brownie mix (and all the ingredients required to make them) (I would suggest a "moist" brownie mix - advertised as extra fudge or rich)
4 oz cream cheese, softened to room temperature
1/4 c. granulated sugar
1/3 c. pumpkin puree (you can use canned pumpkin and puree it with a blender)
1 large egg (in addition to any that might be required for the brownie mix)
1 tsp. pumpkin pie spice

Prepare oven according to brownie mix directions.  For best results, use a parchment lined pan and spray it with non-stick spray.  After preparing brownie mix and pouring it into the pan, set aside and make the topping:

Beat together cream cheese and sugar until fluffy.  Add pumpkin puree, pumpkin pie spice and egg and beat until well mixed.  Using a tablespoon put spoonfuls of the topping onto the brownie batter.  Using a toothpick or knife, swirl it around into the batter.  Don't forget to make some pretty patterns!
Bake the brownies according to directions (about 35-40 minutes).  Definitely don't over bake.  If your mix offers you the difference between a chewy brownie or a more cake-like brownie, choose the chewy - you don't want these like cake.  After baking the center should still be jiggly.  Let cool 20 minutes and then use the parchment paper to lift out of the pan onto a wire rack to cool completely.  After cool, put them in the refrigerator for 30 minutes before cutting.

Here they are.  (Again, photographing food is not by best skill):


Enjoy for the holidays or anytime during the year!

cindy

Tuesday, September 11, 2012

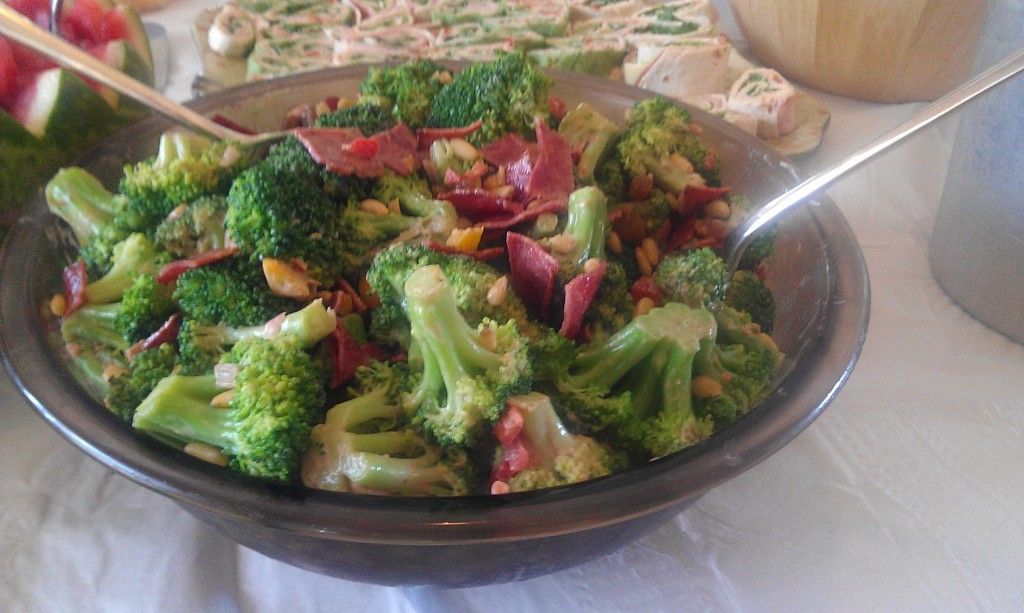
Broccoli - Bacon Salad

Letting go of summer in Phoenix produces mixed feelings.  In Arizona, the coming of fall means that the best temperate weather of the fall and winter.  On the other hand, summer is summer.  In an attempt to hold on a little longer, I offer this recipe.  It is a great cold salad that you can make hours in advance. It's crunchy, sweet and sour.


Broccoli Bacon Salad

Ingredients:

5 slices bacon, chopped into 1/2 inch pieces
1 pound broccoli florets (approximately), cut into 1 inch pieces
1/2 cup light mayonnaise
1 tablespoon balsamic vinegar
Coarse salt
Fresh black pepper
3/4 cup diced sweet bell pepper (red, orange, yellow, or a combination)
1/2 cup golden raisins
1/3 cup pine nuts, toasted

directions:

1. Cook bacon in a 10-inch skillet over medium heat until crisp, 6 to 8 minutes. Remove with slotted spoon and drain on a paper-towel lined plate.
2. Blanch the broccoli: Bring a large pot of water to boil. In another large bowl, prepare an ice bath with equal parts water and ice cubes. Add broccoli florets to boiling water and cook for 1 minute. Remove broccoli with a slotted spoon and place in the ice bath immediately to cool. Drain the broccoli again and dry the florets by spinning in a salad spinner or by laying them out on several paper towels.
3. Whisk mayonnaise, vinegar, 1/2 teaspoon salt, and 1/4 teaspoon pepper together in a large bowl. Add broccoli, bell pepper, raisins, pine nuts, and shallot to the bowl with the dressing, and toss to combine. Season to taste with additional salt and pepper as needed, then sprinkle with the cooked bacon. Chill until ready to serve.
That's it!  With the blanched broccoli, the brightly colored peppers and the bacon.  It's a great easy salad that is sweet and substantial  Enjoy!

cindy


Sunday, August 26, 2012

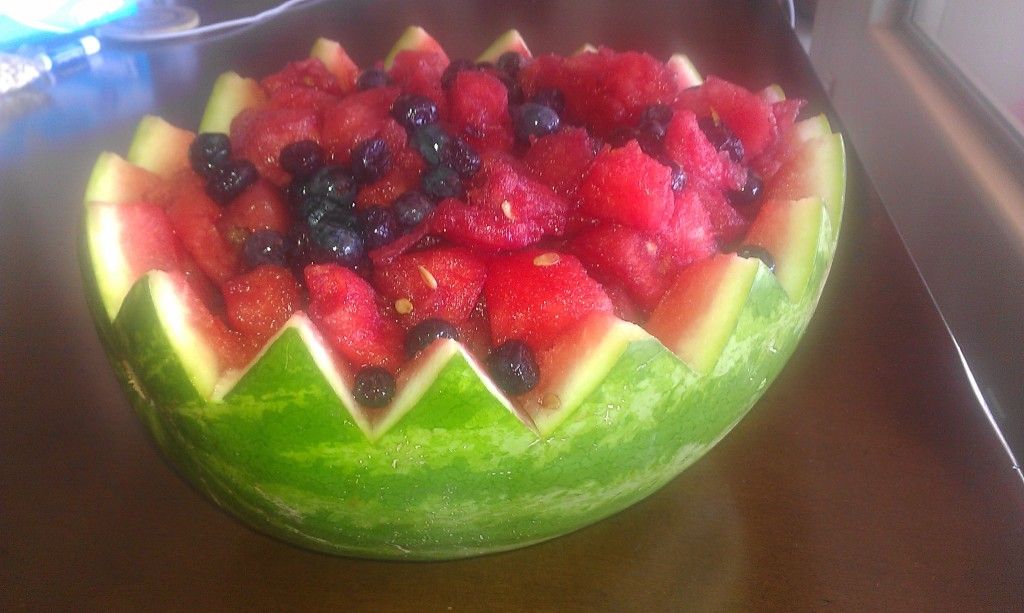
Watermelon Blues

As the summer ends, there are things that go away. One of those things is watermelon. There are also people who are going away - high school graduates off to college and a dear friend who is off to the seminary. A week ago we had a party to celebrate our new seminarian and I made this recipe.


Thursday, May 17, 2012

DIY Girl's Summer Camp

Last week I posted about getting together with other moms to "share the joy" of having the kids at home all summer.  I suggested taking turns hosting a day camp.  Last week it was the boys and now it's time for the girls.  Even if you don't want to have other girls, here are some ideas of things to do with girls when "I'm bored!" inevitably comes.  A lot of these will look like my suggestions for boys, but they're equally applicable to girls.

1.  Swimming. This is a staple stand-by, but try to spice it up.  Go to a different public pool or a water park or get out the "slip and slide" with bubbles or shaving cream.  Hose them down when you're done.

2.  Biking. Again, take the bikes somewhere new and explore.  Many areas now have designated bike paths so you don't have to worry about traffic.

3.  Visit a Museum. This can be a great way to beat the heat and can occupy the entire day. Every area has their own "best" museums.  Here in the Phoenix area we have the Musical Instrument Museum which is just what it says, and more.  You can listen to a number of instruments you've never heard before, or try some out. You may have a great science, children's or natural history museum close to you.

4.  DIY Spa Day.  Break out the cucumber slices, lotions, nail polish and foot bath.  You can take turns with manicures and pedicures, or, if doing it yourself doesn't appeal to you, head out to the local nail salon.

5.  Crafts.  This is, of course, my favorite.  It's probably a good idea to have a plan for a specific craft ahead of time so you can have everything ready.  As an alternative, you can get out a bunch of random supplies and scraps and let them create a masterpiece!

6.  Shopping Spree.  This isn't what it sounds like.  There is no money involved.  Take the girls to the local mall and give them $1,000 in pretend money.  Keep a tally for each and let them go wild.  This is great fun and teaches them the value of money.  (You won't believe how easy it is to spend $1,000!)

7.  Fashion Show.  Have each girl bring some clothes and shoes (especially ones they would like to swap). Have the girls take turns putting together outfits with all the assorted clothes.  Perhaps they can even swap clothes!

8.  Nature walk.  Time to get outside again!  Go to a local park or nature area and give the girls a list of things to find (like an ecological scavenger hunt).  The first girl to get every item wins a prize.

9.  Cake decorating.  This is fun whether you have a lot of supplies for decorating or just a few.  Each girl gets to make her own cake (preferably from scratch) and then decorate it.  This is a great way to teach girls about following recipes and cooking.

10,  Pop Popcorn and Watch a Good Movie.  This is a no-brainer and makes for a quiet afternoon (as long as you pick out the right movie).  Don't be afraid to pick out a movie the girls have never heard of, especially if it is an older movie.  You'd be shocked to find out that little girls love Shirley Temple movies!

Hope that's enough to get you started.  I'm jealous now because I work full time outside of the home and I would love to do all of these things.  Please live vicariously for me this summer!

cindy

Monday, March 12, 2012

Salt Dough Easter Decorations


I love making Easter crafts.  It's a great sign of spring and you can show them off at Easter dinner.  I have some cute Easter/spring cookie cutters, but didn't want to make cookies because they are a bit counterproductive to my weight loss ; )  I decided to try some salt dough - it rolls out and cuts well and makes a semi-permanent decoration you can use for years to come.  The Craft Diva helped and offered to model the process.

Salt dough = 1 cup flour, 1 cup salt & 1/2 cup warm water (a little more if you need it).  I doubled the recipe for this project.


Mix and knead your dough.


Take a short break to be silly.


Cut the dough with cookie cutters.


Bake at 200 degrees for 1-2 hours or until hard.  If you live in a dry climate, you can put them in the sun.


Finished baking.  Time to paint with acrylic paints.  I used a white glitter/shimmer paint on top of the acrylic, although this is optional.  Varnish or use sealant to preserve and shine.


A prettier (and healthier) alternative to chocolate bunnies and Peeps!


Happy Easter!

cindy


Saturday, February 11, 2012

Fit Friday - Be Prepared

Remember that old scouting motto?  I'm starting to think it might be one of the keys to stabilizing my weight.  I have had a lot of success on any number of diets, and I'm convinced that the reason is that if someone is telling me exactly what to eat, I can do it.  (I'm also convinced that is why Weight Watchers works for so many people - you learn to make your own educated decisions about what to eat.)

I'm a busy person.  My days are not well planned and planning what I eat is very low on the priority list.  Ideally, I would carefully plan each day's meals in advance, carefully counting the calories and the fat content, but that's just not realistic.  The other thing about me is when I get hungry or tired, I will eat anything I can find, especially easy comfort food.

I am trying to work around all that.  I have come up with a short list of "meals" I enjoy for breakfast, lunch and dinner.  Some of them are fast on-the-go meals (even some "fast food") and others are things that are served in places I frequent (like the work cafeteria or favorite restaurant).  By having that short list, I can go into autopilot when I'm in a hurry, tired or hungry and eat something that's not going to sabotage my day.  The short list can even be tailored to suit any restaurant, with the exception of Mexican food which is very hard to eat reasonably.  

Strangely enough, my most difficult place to eat is not "out" but at home.  When I get home from work, I'm immediately foraging for food, even when I know what I am going to eat for dinner.  That's something I have to work on.  I'm thinking about coming up with a specific "snacks" I can turn to when I get home.

A little planning now might pay off in a big way.

Come see more tips at Fit Club - just click on the link to the right --->

cindy

Tuesday, January 3, 2012

Muddy Buddy Snack


I took these pictures with Christmas decorations, but this snack is great anytime and may be the sweet compliment to all the salty snacks for the Super Bowl.  The dry ingredients are somewhat approximate, just make a big bowl of crunchy stuff and then mix it with the other ingredients.  You need:

1 cup semi-sweet chocolate chips
1/4 cup butter
1/2 cup peanut butter
1 tsp. Vanilla extract
4-5 c. Chex (any flavor(s) you like)
2 c. Mini pretzels
1 c. Powdered sugar


Place first three ingedients and heat in microwave for 1 minute. Mix well and heat more if needed to melt everything. Add vanilla extract and mix well.  Mix dry ingredients (you can also add nuts, M&Ms or anything else).  Pour chocolate mixture over dry ingredients and mix well.  Transfer the mixture into plastic ziplock bags with 1/4 to 1/2 cup of powdered sugar in each, close and shake to coat.  Coat all of mix (adding more powdered sugar as needed). Serve or chill to store.

 (I just noticed my pictures look like it's a container full of powdered sugar, but it's my flash adding to much light.  It is coated, but not drowning in powdered sugar!)

Dive in!!

cindy


Friday, December 16, 2011

Last Minute Gifts - Cranberry/Orange Snack Mix

It's getting down to the wire when I've got to think about all the "little" gifts I need - for teachers, babysitters, mailmen, other last minute recipients.  These are my favorite gifts because although I like to make them interesting, I don't necessarily have to give a lot of personal thought to them.  I also like to combine my love for the deal.  Specifically, I like to buy Christmas things right after Christmas for a song and wait and use them the following year.  When I unwrap my Christmas decorations, I enjoy finding something new - like Christmas comes early.  Last year I found these glass Santa containers on sale for $1.00 each (originally $4.99) at Target.  I thought I would make cookie mix, but because of the small size, I needed to think of something else.  Cranberry/Orange Snack Mix


The ingredients are pretty simple:

2 c. Corn Chex
2 c. Oat squares
2 c. Mini Pretzels
1 c. whole almonds
1/4 c. butter
1/3 c. frozen orange juice concentrate, thawed
3 Tbl packed brown sugar
1 tsp ground cinnamon
3/4 tsp ground ginger
1/4 tsp allspice
2/3 c. dried cranberries (Craisins)

Preheat oven to 250 degrees and coat a 13X9 inch baking pan with non-stick cooking spray.  Mix the first four ingredients in a large bowl and set aside.  In a smaller bowl melt butter and add orange juice concentrate, brown sugar and spices.  Mix well and pour over the dry ingredients, stirring them to coat. 


 Spread the resulting mix on the baking pan and bake for 50 minutes.  You will need to stir the mix every 10 minutes.  


Once it's done, you add the Craisins and lay the mix out on a flat surface until it's dry.  You can store it in any airtight container.  As an extra bonus, your kitchen will have a wonderful smell of spiced orange and cranberry.  


This is better than any old cookie mix :)

cindy

Monday, November 14, 2011

Pinterest Challenge - Part 2

The other day I took the Pinterest Challenge to create several of the items I saw on Pinterest.  Over the weekend, I tried a muffin/cupcake recipe:

You start with a box cake mix and a 15 ounce can of pumpkin (or you can buy the 29.5 oz can and two cake mixes).  You add - NOTHING!  That's right, two ingredients.  No eggs, oil, water or vanilla extract - NADA!


I could not believe what I was reading when I saw this recipe.  There must be more ingredients.  The result is probably dry.  The whole thing will taste like pumpkin.  NOPE.  You can use any kind of cake mix you want.  I wanted to make a bunch of cupcake/muffins, so I tried spice, yellow and devil's food cake mixes.  (If you read my other posts about weight loss, these were a bit of a downfall.  However, I understand these are considered fairly healthy and even have a Weight Watcher point value somewhere.)

Just mix the pumpkin and the cake mix with an electric beater


Spoon into muffin/cupcake tins lined with cupcake papers, and after 23 minutes at 350 degrees, you get this for the spice muffins:


And this for the chocolate/devil's food cake (these are actually pre-baking):


As for taste - excellent!  You can taste the pumpkin in the spice ones, but not at all with the yellow and devil's food cake mixes.  If you want an even more flavorful spice version, try adding a little cinnamon or a dash of nutmeg to the mix.  We also added chocolate chips to the chocolate cupcakes/muffins, which was just awesome.  You can also add cream cheese frosting to the spice or yellow muffins.  A note - I keep referring to these as muffins/cupcakes because the consistency is a cross between both.  It's not a cake, but a very moist muffin.  The best part for me was that they were so quick and easy to make, and the yield is about 18 cupcake/muffins.

Success!  One Pinterest Challenge down, three to go!


cindy


Thursday, November 10, 2011

Pinterest Challenge

I recently saw a blog where someone tried to replicate some of their pins from Pinterest.  It does make sense - isn't that why so many of us like Pinterest for DIY?  I want to take the challenge to make a few items that I've seen on Pinterest.  I'm not challenging myself to make them exactly as they appear in the pin, and I'm not setting a time limit.  (This is supposed to be a challenge, not a chore).  Here's the pins I want to do:
Source: etsy.com via Cindy on Pinterest

This button idea looks labor intensive, but might be cool in my office.


I don't have a baby, but I think this would be great to make for a group of unwed mothers.


I know mine definitely won't look like these, but I do have a pattern for a pincushion I want to try!


This would be great for a holiday meal!

OK, I think that's as many as I dare to take on!  Again, no promises as to when I will get this challenge going, but now that I've put myself out there, I have to try.  By the way, all of the pictures above go back to my Pinterest boards and ultimately back to the websites of origin.  I did not take any of these pictures and claim no attributes, but leave that with the original sources which you can see yourself.

Wish me luck!

cindy

Thursday, November 3, 2011

Loving Me Some Sparkpeople!

`Have you checked out Sparkpeople??  This has to be one of the best weight loss sites on the web.  There's so much to say about it but I'll give you ten of the best reasons:

SparkPeople.com: Get a 100% FREE Online Diet

1.  It is completely FREE.  No, really, it is completely free.  It costs nothing to sign up and you never pay a thing.
2.  It is NOT a diet site.  It does not encourage you to pick a "diet," but one is available if you need it.  Mostly it is a support site with great tools to help you.
3.  You can track your weight, food and fitness levels, as well as energy, measurements, goals or anything else.
4.  There is a huge community of people, both local and groups with common interests where you can participate for advice, support or ideas.  There are message boards, blog opportunities and a place where you can create your own page.
5.  Sparkpeople has workout plans, exercise demonstrations, reports of your activities and suggestions for improving your calorie to exercise balance.
6.  There are great articles on health, fitness, recipes, nutrition, motivation and lots more.
7.  You can motivate yourself with streaks, challenges, group activities, spark mail and emails (only if you want them) and stages of weight loss/improved fitness/increased wellness and health.
8.  There is a mobile application to track food, fitness, weight, water consumed and give you reports about the same (oh yeah, it's free too)
9.  The site was started by a guy who approaches weight loss, increased fitness, wellness and lifestyle with a practical and easy methodology (balance calories consumed with the amount of exercise done)
10.  Did I mention it's FREE??

Free Online Diet Plan at SparkPeople.com

I can't say enough about this website.  If you are interested in a place where you can get practical advice, support, a place to track your progress and a never ending supply of information, Sparkpeople is like no other place on the web. By the way, I was not compensated (or even asked) to recommend Sparkpeople.  I just believe in it.

cindy

Thursday, October 27, 2011

Recipe - Shepard's Pie

Now that I only eat 500 calories a day, I'm oddly fascinated with cooking for my family using what we have hanging around.  Keeping this in mind, I decided to do something with the Grand's Biscuits we had in the refrigerator.  I came up with this concoction and I think it turned out pretty good (even though I couldn't taste it).

First, I split the biscuit dough into two piles (4 biscuits in each).  Then I rolled out the first pile until it could fit in the bottom of a pie pan (it wasn't that difficult).  Next comes the fun, creative part.  I browned a pound of ground beef and added whatever I could find (and my family would eat).  In our case, that was a can of corn and a can of ranch beans (light pinto beans in a sauce).  I'm sure others would get more creative, with potatoes, onions, peppers, peas or other things I didn't have in my cabinets.

After combining the ground beef with the warmed beans and corn, I put the mixture into the pie pan on top of the rolled crust.  The amount of the beef mixture was higher than the sides of the pie pan, but that was OK.  Next, I rolled out the other pile of biscuit dough and put a "lid" over the top of the pie.  I put small slits around the top so it could vent (and it ended up looking very pretty too).  Here's what it looked like before I put it in the oven:


I used the directions on the biscuits as a guide and baked it for 20 minutes at 350 degrees.  It was almost too gorgeous to eat!


I was surprised at how easy this was, but the bigger (and better) surprise was how much my family (especially my kids) liked it.  Even my picky son enjoyed it and ate a good helping of it.  It's not as pretty after it's been cut, but this gives you an idea of the inside ingredients:

 
The best part about this recipe (other than how easy it is) is how you can make it different each time.  You could make a pot pie with chicken with vegetables and a sauce, or a use other vegetables with ground beef.  I guess mine looks a little Southwest, although we're pretty wimpy about spicy.  All together it makes a great hardy family meal and takes less than an hour to prepare.  Enjoy!

cindy

Sunday, October 23, 2011

New Adventures Part 2

It's now been 2 weeks since I started dieting with HcG and I'm happy to say I have lost 15 pounds.  It's pretty incredible, I can hardly believe it myself.  I don't think my head has kept up with my shrinking body because it's going so fast.  It's not easy and I think at some point I'm going to have to be really creative to think of different ways to eat with pretty limited choices.  For the record, that's 100 grams of chicken breast, steak (once a week), eggs or fish; an apple, half a grapefruit, strawberries (which are now out of season) or orange; and 150 grams of cabbage, romaine, spinach, broccoli, tomatoes or cauliflower.  That's one of two meals a day - the meals are exactly the same makeup.  Results, however, are incredibly motivating.

While I'm in automatic pilot eating what I have to, I've been starting to notice when I want to overeat.  Sometimes I'm bored or thirsty and sometimes it's when I've waited too long to eat and am famished.  I also have sweet temptations all the time.  The worst is that I tend to eat while I cook.  I'm focusing my energy on becoming conscious of those times and trying to come up with coping mechanisms to deal with them.  I'm also starting to formulate a plan for when I will be done and how I want to hit the ground running with a strategy for long term maintenance.  I already know one habit that is a keeper - I'm tracking everything I eat to review the calories and nutritional value of what I'm eating.

Overall I'm very pleased with the results and it hasn't been too painful yet.  I'm still not sure what effect blogging about this is going to be, and God forbid this doesn't work - yikes!  In the meantime, hopefully soon I can update with a change in clothes size :)

cindy

Friday, August 26, 2011

Southern Cooking

The last couple of months I have been longing for comfort food I remember from my southern family.  My dad used to make a couple, and my mom made a few too.  Some things I definitely don't miss - brussel sprouts, liver & onions and "greens".  (However on a recent trip to Louisville, we had some great "greens" with spinach sauted in pork fat - yum!)  The two I've been particularly interested in making were chicken & dumplings and peach cobbler.   One of the interesting things about these dishes is that my husband and I both remember very similar recipes from our childhoods.

For those of you with "northern" families, I'm not talking about chicken & dumplings that are big round globs of flour dropped into boiling water.  I'm talking about the thinly rolled and cut dumplings that are gently placed in a pot with lots of chicken and broth.  My mom and grandmother never gave me a recipe for this fine dish, but I recently found a promising one on allrecipes.com.  I'm not listing it here as a recipe, because I'm not quite sure I perfected it - a little too soupy for me.  I also didn't roll the dumplings quite thin enough or have the water boiling enough.  Have to try it again.

In the meantime, it's peach time and I'm ready to try some peach cobbler.  I was wimpy (and not true southern) by using pre-made sugar cookie dough as the bottom crust, but hey, I did try grandma's pastry crust for the top.  My results were OK, but not quite good enough.  Here's the peach filling before I put the crust on:


I used white peaches, which I don't think were as sweet.  Being wimpy on the bottom crust wasn't very satisfying, but the top pastry part was promising.  I'm going to have to give this one another try too.

I'd love to hear about your favorite childhood comfort food.  In the meantime, I'll keep working on mine.

cindy

Tuesday, August 23, 2011

Recipe - Easy Key Lime Pie

I saw a blog featuring a recipe for key lime pie recently, but I couldn't find it again when I wanted to make it.  So hey, I improvised!  I can't say this is completely original, but I will say I combined several recipes to make this one.  After I finished I realized I made enough filling for two pies, so this recipe is for TWO pies.

You need:  Zest from one lime, green food coloring, Lime Jello (10 oz)


1/2 cup of lime juice


One can of sweetened condensed milk


One container of Cool Whip


Two Ready Graham Cracker Crusts


Prepare the Jello as instructed on the packet (dissolve packet in cold water and then add boiling water).  Put in the refrigerator.  When the Jello begins to congeal, remove from refrigerator.  In a separate boil mixed condensed milk, lime juice, zest, Cool Whip and a few drops of green food coloring (optional).  Mix well.  Slowly add Jello and mix together.  (If you let the Jello get too firm, you will end up with Jello chunks in your pie - but it still tastes great).  Pour the mixture into the two pie shells and put in refrigerator.  Allow to form for several hours.  Garnish with fresh lime slices.  Yummy!!


cindy