Showing posts with label storage. Show all posts

Wednesday, August 20, 2014

College Organization Tips - Just In Time!

You're off to college with all your stuff!  Now where are you going to put it?  That is perhaps the most important question you will answer during the first week and it may define how well you coexist with the stranger with whom you will share a room for the next 9 months.  Here's a compilation of some of the best ones I have found.  Some even have a tutorial to show you how to make/do what you see in the picture.

1.  The key to dorm room (or small apartment bedroom) organization is maximizing space - storing as many things as possible in the smallest amount of space.  In a room with limited square footage, the key is using the vertical space.  Here is a great article from BuzzFeed that has some great ideas:


2.  Bedside Solutions - Keep your reading materials, phone, remote and other things close without a bedside table.  The second caddy hangs between the mattress and base of bed.  You can make lots of those caddies to go around the bed for odd storage.


3. Keep your electronics charged without losing cords or small items.


4.  Keep your desk space clear.  Here's a clever way to move your desk supplies up on the wall by attaching small magnets to your desk items and putting them on a metal board.


5.  Over the door storage - the back of the closet door is prime real estate.  You can use the clear plastic bags or baskets that hang behind the door.  If you keep the storage high enough you will still have room for some hooks toward the bottom of the door for wet towels, etc.  Click on the first picture for more over the door storage ideas.


6.  Maximize the space under the bed.  The higher up the bed, the more space you will have under it for storage (or living).  Warning - be careful not to prop up a bed in an unsafe way!  Depending on how much space you can get under the bed, you can put things as big as your desk or as small as under the bed plastic storage bins.  Use a flat sheet to create a decorative "curtain" to hide stuff under a raised bed.


7.  Closet organization.  In addition to the over the door storage I already mentioned, you need to use hangers that maximize the vertical space.  Try a skirt hanger that can handle six items at once, or soda can tabs or chains to stagger multiple hangers.  Use a tie rack for camisoles or tension rods on the sides of the closet for shoes.


Strategic planning is best for the dorm room, but don't forget to involve your room mate in the process! Good luck at school.

cindy

Saturday, July 14, 2012

Folding It Up

Everybody has household chores.  I'm lucky I have a great husband who does a lot of them.

One job that I was forced to do have is to fold the laundry and put it away after Kent washes it.

I hate folding laundry.  The only thing I hate worse than folding laundry is putting it away.  We are constantly doing laundry and it piles up.  We had to buy extra laundry baskets because we had too much laundry.  On the rare occasions when all the laundry is clean, I have nowhere to put all the clean clothes.  (How is it then that I never can find anything to wear?)

Did I mention . . .  I HATE FOLDING LAUNDRY!

Today I bit the bullet because Kent did ALL the laundry (in one day).  As of now I have all of it folded, but it's sitting on the living room floor while I "take a break".  In a minute I have to find a way to get all of our clothes crammed put away in our drawers and closets.  Gee, that's going to be fun.

I'll say it again . . . I HATE FOLDING AND PUTTING AWAY LAUNDRY!

It's keeping me from frantically running retreating to my craft room until I finish, and at the rate I'm going it will be bedtime before I get to go in there.

I REALLY HATE FOLDING AND PUTTING AWAY LAUNDRY!

Oh well, I better get back to it.  It's no big deal, right?  It's not like I hate abhor detest dislike it [wink]

cindy

Thursday, June 21, 2012

Craft Room Reveal - Sewing Area

I've been showing off parts of my Craft Room over the past few weeks and today I want to show you the part that is near and dear to my heart.  It's the sewing area.


It's really one entire side of the room, across from the scrapbook area.  I love JoAnn's generally, but really regret two (expensive) purchases I have in my craft room.  First, this sewing table - almost $200.  It's small, and the drawers don't open well.  The other thing that is more frustrating (especially tonight) is the ribbon storage unit I bought.  It wasn't well made and I struggled with it until I finally gave up tonight.  (See my solution below).  I am happy with the painted pails that hold needles, bobbins, pins and buttons.


This is the corner next to the main sewing table.  It has my serger and some items I bought at a garage sale. I'm using the lanterns for supplies for headband making and elastic.


As of tonight it is also storing my ribbon after the epic fail of the ribbon holder.  I have some styrofoam balls recycled from Christmas ornaments that I used in another craft.  I took the dowel rods from the ribbon holder and sunk them vertically into the balls.  I put the ribbon on and lined them up on the table shelf.  (BTW, that little table was made by my dad in high school back in the 1940s.)


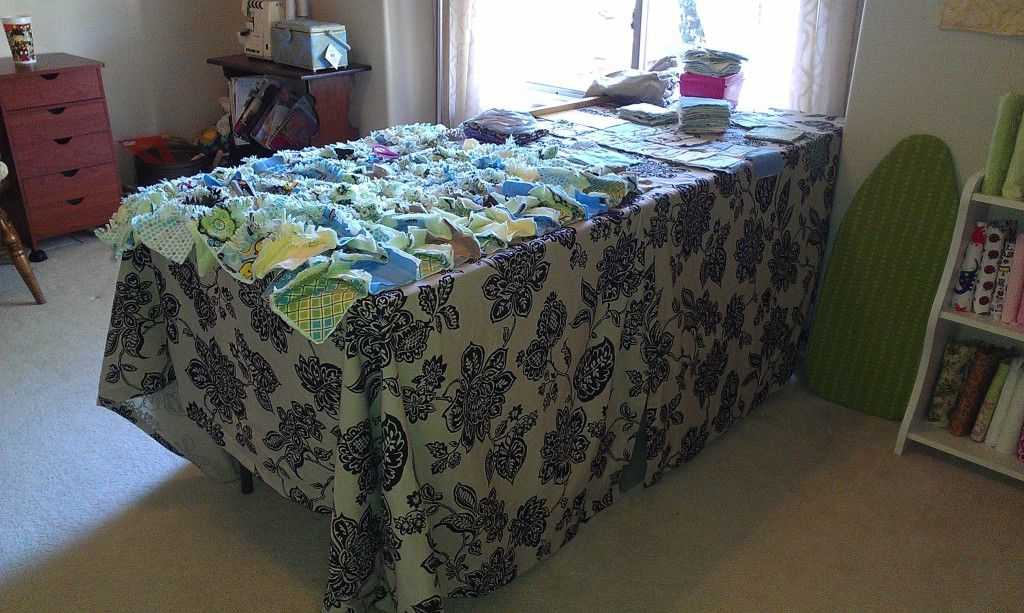
This is my cutting table.  I bought it at a Blockbuster that was closing for $30.  It's 6 feet long with a durable plastic top.  I covered it with two curtains I bought on sale at Target.  I covered it so I could use the area underneath for bin storage for scrap fabric and yarn.  It works really well with a plastic cutting mat on top of the fabric cover.


Last but not least is my fabric storage.  I described the shelf fabric storage in another post, but I've combined it with the shelves in my closet.  I've said it before, but I'll say it again - I have too much fabric and need to start using it before I buy anymore.


So, that's it!  It is my new favorite place - where my family knows I'm at when they can't find me.  Yep, I have everything but a bed in here.  Let the creativity begin in earnest!

cindy

Monday, June 11, 2012

Scrapbook Station

I've been so busy trying to finish a few projects before opening the Etsy store (Pretty Pretty Cindy), I haven't had time to post, but I'm excited about showing one of the best parts of the new craft room - the scrapbook station.

 I started with this armoire/computer station which I didn't want to move out of the room.  The first challenge was getting the corkboard to stick to the back of the cabinet. After a lot of fits and starts, I came up with VELCRO!

Next was finding a place for all my stamps.  This cabinet has a double pull out tray, one for the computer keyboard and the other a work area.  I used the computer keyboard tray, put on some non-stick/non-slip shelf liner and arranged the stamps in a small antique drawer in a way I can see them all.


Next, I had this old two-sided hanging thing for jewely. I turned it into a sticker/embellishment holder. Again, I can see everything and it's double sided!


I moved on to these plastic baskets I found at Goodwill and attached them to the corkboard with push pins -perfect for little items.


I used an old letter holder to keep bigger items.

I found these 4 glass candle holders at a garage sale and turned them into cute storage for ribbon and adhesives.


I bought a scrapbook/photo album and used it to keep all my letter stickers. You guessed it, I can see them all.  If you have a lot of letters, buy two books -mine is a little too full.


This was the one item I splurged on - a turning caddy. I bought it at Michaels, but I used a 50% off coupon to make the sticker shock go away.


I bought some pretty baskets at Michaels (on sale) and stored assorted items I want to keep out of sight.  An extra bonus is that the shelves are just a little deeper than the baskets, so when I pull out the basket, I can tilt it on the drawer so it stays accessible while I look through it.


Here's another item I am proud of.  I converted a shoe keeper we never used, took out a divider and it became instant paper storage!  I've heard that the best way to store paper is upright, but I'm not sure how to to that.  I did spend a tremendous amount of time sorting the paper by color.  You're looking at about 30 pounds (or more) of paper.  I need to give some away because I couldn't possibly use it all.


Well, that's it.  Here's the funny thing - although I have a good amount of scrapbooking stuff, I don't really get a chance to scrapbook much.  I've always worked out of travel containers on the dining room table.  My kids are 9 and 11, but in their scrapbooks they are 1 and 3.  I have more scrapbooking on my project list for June.  Now that I have an awesome place to work, maybe I'll get inspired.

cindy

Friday, June 8, 2012

Craft Room Reveal!

The day is finally here - my new craft room is DONE!!  I've been working in there and I love it.  Over the next couple of weeks, I'll show some detailed features of the new craft room, but in the meantime, here's some before, during and after pictures:
BEFORE

DURING

AFTER


I have too much fabric!

BEFORE

DURING

AFTER


My new cutting table where the couch (and mess) used to be.  There is storage under the table for scrap fabrics and extra yarn in bins.  The table cover is made from two curtain panels from Target.  The beer can collection is gone!


BEFORE

DURING

AFTER


Finally, a functional sewing area!  Now I don't have to drag my sewing projects into the dining room and keep them spread out for weeks at a time.  My favorite part of the room.

BEFORE

AFTER


I'm really proud of this part.  I've never had a place to scrapbook and now I have a scrapbook section of the room!  This was another big revelation - I have WAYYY too much paper!  I think I have enough for 20 scrapbooks, maybe more!

So there it is!  I'm so happy it's done, and frankly, so is my family.  It's my very own room for creativity.  Over the next couple weeks, I'll show all the sections of the room and how I organized them.

cindy

Tuesday, April 24, 2012

DIY Fabric Shelf Storage

I'm almost done with my craft room.  I don't want to show the whole reveal because I'm still thinking of ways to decorate it.  However, it's almost completely functional.  One of the things that really shocked me was just how much fabric I have!


Yikes!  What a mess!  I don't buy too much of any fabric (usually not enough by the time I get to a project), but I am a sucker for the remnant bin at JoAnns.  It's a great place for fleece and flannel.  Anyway, I digress.  I am lucky to have these wonderful built-in shelves in the closet:


No problem, I thought.  I'll just neatly fold and organize the fabric on the shelves.


I was able to organize the fabric by type and fold the smaller fabrics into fat quarters and arrange them by color.  But there was still too much fabric!   The flannel I have was especially difficult.  I don't have a lot of any particular pattern, but I do have lots of different patterns.  Flannel takes up a great deal of space when you fold it.

I love reusing stuff and I came up with this great idea to use old DVD cases to wind flannel for storage.  Your know, like this:


By creating little "books" of flannel, I was able to use this discarded bookshelf.


Hey, I can see the floor!  I also love looking at my fabric stash.  I just wish I could make all the things I am imagining.

cindy