Showing posts with label rag quilts. Show all posts

Monday, December 31, 2012

The Best of 2012

I'm sitting here on New Year's Eve about to begin the festivities with close friends.  2013 is coming very fast, so I have barely enough time to think back on 2012.  Here's the quick and dirty "best of"

My Craft Room!  In 2012, I went from Dreaming of a Craft Room to Craft Room MusingsDIY Fabric Storage, and ultimately, the Craft Room Reveal.  I love my craft room, even if it is a mess right now.  2013 will bring more sewing and crafting, God and time willing.


Etsy and the creations in it!  Pretty Pretty Cindy opened in 2012, with all of my various creative projects.  I love having a place to share my projects/creations without needing to find a family member or friend to give it to.  One of my favorite items was this Catherine Wheel Afghan.  It will always remind me of Kawaii where it was made.  I made a few rag quilts (I really need to get back to that):  Raggedy Rag Baby Boy Quilt, Chocolate Pistachio Quilt and Pinkie Rag Quilt.  Then there was the dress making frenzy:  the Watermelon Dress, Upcycled Gauze Dress, Upcycled Denim Skirt and Black Slip Dress.

I also started to share my Arizona with you:  javelinas, other Arizona critters, the Arizona Biltmore, Arizona's Centennial, Sedona and roses, clouds, the State Fair and Verde Canyon Railroad.


See you in 2013.

cindy

Saturday, June 23, 2012

Raggedy Rag Quilt

Do you really like rag quilts?  Love that look of raggedy edges?  This is the rag quilt for you.


I'm still using my favorite fabric (flannel) and I used another piece of flannel in the middle of the square "sandwich."  I used 5 inch square blocks and a 1" seam allowance on each side.  Yes, that means the end measurement of the block was 3" square.

 
It produces a dense, warm (heavy) quilt with lots of rags.  I'm not sure I would do a 1" seam allowance again, and if I did, I would definitely start with a minimum size of 6" square block.  This is still a very pretty quilt, but it takes a lot of squares to get to a crib or toddler bed size.  

One very cool trick I learned was the stitch I used to make the "X".  I used a "S" curve, which I bet is a stitch on almost every sewing machine.  By using the "S" I ended up with an effect on the smooth side of the quilt that I really love (and didn't anticipate).


My picture is not great, but each block matched curves and I didn't do anything special in using the "S" stitch.  Here's another view that might be a little better


I still like these rag quilts and can't wait to try more variations.  Next time I'll try some big squares.  My sewing machine will thank me.

If you are looking for more basic tutorials on rag quilts, check out my post here.  I also have some additional tips on making rag quilts here.

cindy

Friday, June 8, 2012

Craft Room Reveal!

The day is finally here - my new craft room is DONE!!  I've been working in there and I love it.  Over the next couple of weeks, I'll show some detailed features of the new craft room, but in the meantime, here's some before, during and after pictures:
BEFORE

DURING

AFTER


I have too much fabric!

BEFORE

DURING

AFTER


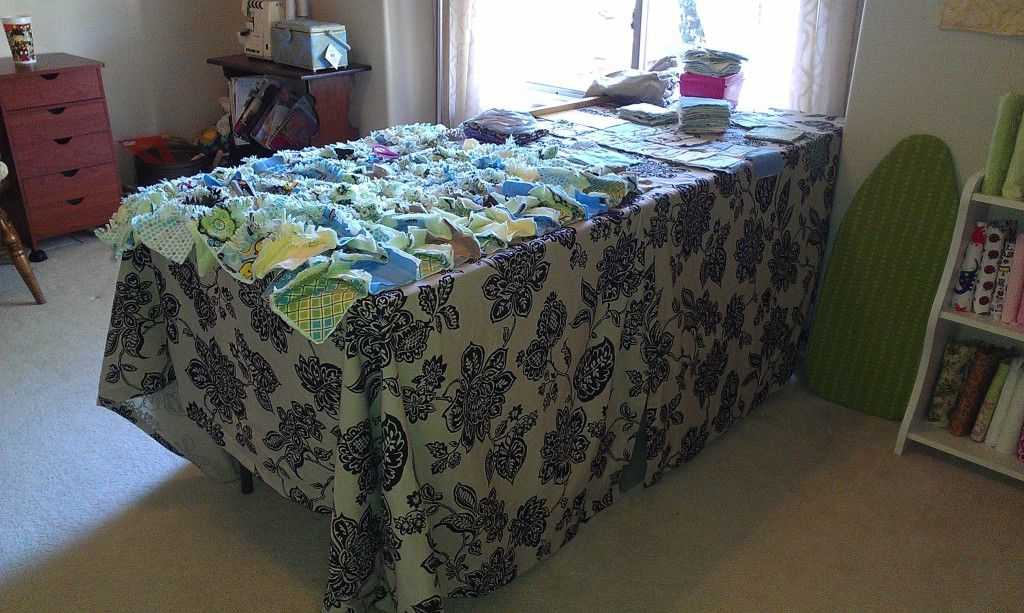
My new cutting table where the couch (and mess) used to be.  There is storage under the table for scrap fabrics and extra yarn in bins.  The table cover is made from two curtain panels from Target.  The beer can collection is gone!


BEFORE

DURING

AFTER


Finally, a functional sewing area!  Now I don't have to drag my sewing projects into the dining room and keep them spread out for weeks at a time.  My favorite part of the room.

BEFORE

AFTER


I'm really proud of this part.  I've never had a place to scrapbook and now I have a scrapbook section of the room!  This was another big revelation - I have WAYYY too much paper!  I think I have enough for 20 scrapbooks, maybe more!

So there it is!  I'm so happy it's done, and frankly, so is my family.  It's my very own room for creativity.  Over the next couple weeks, I'll show all the sections of the room and how I organized them.

cindy

Saturday, May 19, 2012

Rag Quilts - Tips & Hints


I love making rag quilts, but most of what I've learned about making them I learned by . . . making them.  Every time I make a new one, I learn a little more.  Some of the hints work for all types of rag quilts and some are specific to flannel rag quilts.  Here's a few things I've learned to give you more time to sew, and less time to "learn".


Tips for flannel rag quilts:

  • Wash the flannel before cutting.  This is a subject of great debate, and I don't have a specific opinion.  However, if your flannel has sizing in it (feels a little stiff), definitely wash it ahead of time.  With cotton, you always want to wash and dry it first.
  • Be careful with your sewing machine.  Flannel can be tough on a machine.  Brush out the lint OFTEN (especially around the bobbin case) and change the needle at least once during the project.  You may also want to oil the machine, especially if your machine starts to make "chunk" sounds.
  • You don't have to use a piece of fabric between the layers.  Flannel is thick enough without a middle, but your quilt will be more lightweight.  If that's not your goal, use another piece of flannel in the middle, or for real "cushiness" use fleece.  (If you do that, be sure to read the tip above about your sewing machine - read it again and again)
  • DON'T make the middle piece of fabric the same size as the outside pieces.  In using flannel, it will get too thick - 6 layers to sew - which is not good for your machine.  Make the middle piece about an inch less around the edges than the outside pieces.  If you are creating a rag quilt with cotton, you can plan the colors of the middle fabrics so they contrast when you "rag" the quilt
  • Don't worry too much about cutting the squares perfectly.  Flannel is very forgiving.  I'll say it again - flannel is very forgiving.  That's why I started with flannel rag quilts.  By the time you sew them together and rag them, you won't notice if the squares are perfect.

Tips for all rag quilts:

  • Use 1" seam allowances for the best "ragging" effect.  That means you need to cut the squares larger.  Consider - a 5" square will result in a 3" square with ragged edges.  If you're trying to achieve a specific size quilt, do your math - carefully!

  • Wash, wash, wash.  The more you wash a rag quilt, the better the effect

  • Think about using decorative stitches for the "X" on each square.  You can also use different colored thread on the needle and the bobbin.  That way the stitches don't have to be the same color on both sides.

  • When you sew the "Xs" keep the "wrong" side up.  The "wrong" side is the side with normal (not ragged) seams.  By having that side up when you make the "X" you can keep an eye on it.  After all, it's the side that will show the seams the most.
  • Sew the individual pieces using a "flag" technique.  Sew one of the diagonal lines and then add the next block without cutting the thread between them.  This will create a "flag banner"


Don't worry about overlapping corners - they are going to get cut and ragged anyway.  This makes the process go so much faster and you will use less thread.  After you sew one diagonal on all the squares you can cut them apart and start all over again with the other diagonals.

  • When sewing the blocks together, use a zig zag stitch - that will give you your best chance of keeping the squares even

  • I get this question a lot - how do you "rag" the corners?  Decide which direction you want to use and go all one way.  Again, rag quilts are very forgiving!
  • Finally, there is one tool you MUST have!  In order to rag the quilts, you can use scissors, but your fingers will go numb pretty quick.  You need spring loaded snippers.  You can find them in any fabric store that sells scissors.  
Have fun - don't be intimidated - here it comes - rag quilts are VERY forgiving :)

cindy

Tuesday, April 10, 2012

Chocolate Pistachio Rag Quilt

I took a break for Easter, but I made it back.  Here is my newest rag quilt.  I call it Chocolate Pistachio.


It's a square baby blanket - about 36" square.  I love the colors in green and brown with a little blue mixed in.  The fabric is flannel with a brown minky on the reverse side.  For the X on the squares I used a leaf decorative stitch, which looks really good on the minky.  I tried to use a contrasting color, but it just doesn't show up on the dark minky.  For the combination of minky and flannel I don't use a middle fabric layer, but if you want the blanket extra warm, you should.


I've struggled a little with keeping the squares lined up using a straight stitch.  On this quilt I changed to a zigzag to sew the squares together.  Much better!

I've been working on a number of projects I will be showing soon.  Stay tuned!

Monday, February 27, 2012

Pinkie Rag Quilt

It's been a while since I've been able to post about a project.  I have been working on several things, and may even have an exciting announcement coming - sometime.  In the meantime, I finished this hot little number for my daughter:


I love these rag quilts.  I used snuggle flannel and for the first time I worked with minky.  How luxurious!  I also tried using a decorative stitch to make the X over each block.  I laid out the blocks to get the pattern correct.


This time I tried sewing the blocks in groups of four and then putting the 4-blocks together.  I think overall it's a good method with one big exception:


I should probably do vertical couples instead of horizontal.  Also, you can tell when it's time to change your needle when your blocks starting looking "off" like this:


This actually isn't as bad as it can get.  Last night I was sewing two blocks that were exactly the same size, but because the needle was blunt, it sewed the blocks with one side an inch longer than the other.  A sharp, thick (heavy weight) needle is a must when you are sewing the multiple layers.


The best part is the ragging - cutting the little strips in the exposed seam allowances.  If you want to keep your hands from cramping, you need the sharp snippers


I've been asked how to handle the center point where the four blocks come together.  Just snip the seam allowances in a way so none of the seam allowances is sewn down.


I love child labor :)  I'm partying in the linky party with Everyday Beautiful


cindy

Saturday, September 24, 2011

DIY - Rag Quilt

I've wanted to learn to quilt for a while, so when I found rag quilts I knew this was something I could teach myself.  Rag quilts are so soft and cuddly, especially when they are made from flannel.  The beauty of rag quilts is that the seam allowances are on the outside and you don't have to worry so much about the squares matching up perfectly.  The quilting part is easy too.
First, pick out your fabrics.  I'm going to give instructions based on flannel.  Flannel is not fleece.  Snuggle flannels are thin, fleece is that thick blanket stuff.  On traditional quilts, you usually have multi-design fabrics on one side and a single design/single fabric used on the other side.  You can do the single fabric design on one site, but on a rag quilt each square is quilted through as opposed to making a “quilt top” of multiple fabrics pieced together and quilting it to a single piece of fabric on the back.  In addition to your flannel fabrics, you need batting for the middle.  This is easy for a flannel rag quilt too, as you can use a thin muslin (or even another piece of flannel) instead of that white fluffy stuff.
I've seen debates online about whether to wash the flannel before you quilt.  I was taught to always wash fabrics before sewing and I have noticed that some flannels come with lots of sizing (think starch).  I wash mine first, but I'm sure it's not fatal whether you wash or not.

Cut your fabrics into squares.  I cut mine approximately 5” square.  That allows for 1” seam allowances on each side.  You can cut your muslin batting about 4" square, especially if you don't want the muslin fabric to show in your "rags".  Create a "sandwich" with three fabrics - the back, the batting and the top.


I think it's easier if you just assemble all of the "sandwiches" for your quilt all at once.  Now you're ready to quilt.  You are going to sew an X across each sandwich.  I recently saw a quilt where the quilter used one of the decorative stitches on her sewing machine.  She used the "leaf" stitch which is probably on even the most basic sewing machine.  Make sure you are using a heavier needle for this project, because as you start sewing the squares together, it can be tough on your machine if you aren't using a heavy needle by then.


Here's a great trick I picked up online.  As you are sewing one side of the X, take the opportunity to sew more than one square.  As you sew from corner to corner, have the next sandwich ready to pick up a corner as you finish the diagonal on the other.  This will make a "flag" or "banner" effect where your squares are linked together.  That way, you don't have to stop and cut the thread every time you sew a single square.


If you're using this "flag" technique to sew, you will do one half of the X on all the squares.  Cut the threads between the squares and repeat the process to stitch the other diagonal making the X.


Once all of your squares with Xs are made, you are ready to sew them together.  This is the fun part.  In rag quilting, the seam allowance is toward the "right" side of the fabric.  If you are using a single design of fabric on one side of your quilt, the seam allowance would go to the side with the multiple fabric designs.  Use a 5/8" or 1" seam allowance between the squares (the deeper the seam, the more "ragging" effect you will have).


See now why you need a heavy needle sewing these together?  You are sewing through six layers of flannel.  Watch for lint buildup in your sewing machine, as flannel does shed lots of lint.  Once you sew the squares together, sew a 1" seam all the way around the quilt.  Now it's time to "rag".  This is where I highly recommend you invest in a snipper.  It's not like scissors because it is spring loaded and very sharp on the point and blade.  You will thank me because ragging goes a lot quicker and your hands won't permanently cramp (although they will hurt).


Ragging is the kind of thing you want to do on the couch in front of the TV.  You just cut little slits into the seam allowance, being careful not to cut the seam itself.  The thinner you cut, the fuzzier it will be after washing.  Make sure to rag around the outside edges of the quilt too.  To get the rag effect, wash and wash.  The more it gets washed, the softer and fluffier it gets.  (Watch out for that lint in your washing machine).


There you have it!  You can make these quilts in "lovey" size, baby or even full size quilts.  They are easy and fun too!  I made a bunch for Christmas presents last year, so now's a great time to get started.  You can also join Craftsy in a project to collect 1000 blankets and hats for winter by making a few quilts for them.  Have a great time!


cindy