Showing posts with label home. Show all posts

Thursday, May 28, 2020

DIY Day Camps During Pandemic


Anyone with a child at home under the age of 18 is experiencing some level of stress as summer stretches out before us in a world dealing with the COVID-19 epidemic. This is NOT a post to debate the issues of whether or not to venture out for organized activities or camps. If you want that local (Arizona) debate, there is a great post from Raising Arizona Kids.

However, if you have decided to create your own "at-home" experience, here are some resources that might help you. The key point is plan, plan, plan! If your kids are at camp, whether sleep camp or day camp, their schedules are tightly controlled. To create your DIY camp, I would suggest doing the same. My second suggestion is to make these activities feel "different." You've been home with the kids for some time now and to get everyone in the "camp" mood, this needs to feel special or different. Of course, you can always pick and choose fun activities from this list. So, let's create your own DIY summer camp with step-by-step instructions!

1. Create a name for your camp. Many years ago, I entertained my (now adult) niece and nephew at Camp Campbell.  One of our first "arts and crafts" activities was making a camp shirt.  Here's a link for an easy way to make tie-dye shirts with acrylic paint. It would be very easy to create some stencils with your "camp" name and paint them on after your tie-dye shirts are done. You just created 2 days of arts and crafts activities and a memento of their camping experience!


2. Plan your "camp" meals. If you want to keep it easy in a "day camp" setting, you just need to plan fun lunches that you can eat picnic style. I've packed a ton of ideas onto a special Pinterest board, Day Camp so you should have no problem planning ahead. If you really want to be adventurous and include a "sleep-over" camp with a fire, don't forget to include the s'mores and at least one "campfire" meal.  I've also included some links on the Day Camp Pinterest board for that.

3. Keep a strict schedule. Be sure to plan educational activities, physical activities, arts & crafts and quiet time into your camp, keeping in mind the ages of your campers. See the list of links below as well as my Pinterest Day Camp page for specific ideas on each type of activity. Consider creating a schedule board for each day, or a handout for the "campers" so they know exactly what is coming.

4. Consider at least one overnight camp out in the yard. This could include a tent and campfire, or as simple as some blankets and sleeping bags in the living room. 

5. Get some "camp counselors." If you have older kids, get them involved! Younger kids will be thrilled, you give those older kids something to do, and take some of the pressure as "camp director" off of you!

6. Have a specific "start" and "stop" to camp, especially if you are doing a "day camp" format. It's not sustainable to keep "camp" going indefinitely and kids will likely lose interest if you try. Keeping a "start" and "stop" is almost as important as keeping a strict schedule because it gives kids the feeling of something "different".  You also get time off when camp is not in session!

Can't bear to do this alone at home?  Here are some resources to local virtual day camps this summer. 

Ideas for Educational Activities
  • Phoenix Water Services has a brand new digital resources pages. The left side is for kids and the right is for adults. Don't miss the fun videos of "Wayne Drop" and "Loo Poo".  There are activity books with coloring pages you can print for the little ones or order free hard copies in advance. Be sure to check out the tons of lesson plans you can use.

  • Virtual Water Festival is another page from Arizona Project WET and geared to teaching elementary students (especially 4th grade) about water. Filled with videos, lessons and games, this is a treasure trove.
  • STEM Lessons Activities from Nerding teaches how to build or do a bunch of fun things, especially for elementary and middle schoolers.
  • Mystery Science has a ton of activities for kids, Kindergarten through Middle School
  • Make a Time Capsule What better time than now??
  • Make homemade cards and send a letter to relatives (just like at camp!)
  • Grow Borax Crystals
  • Make Elephant Toothpaste with a few household items. Cool science experiment - outside.
  • Make up stories, create your own book and illustrate (this can be done over several days)

Ideas for Physical Activities
  • Play at Home - This is a great, interactive and local website that includes mindfulness, songs and a little yoga. It's especially great for preschoolers.
  • Children's Museum of Phoenix has a bunch of videos with movement and yoga, as well as other videos with projects and learning.
  • Swimming - Don't have a pool? Create a slip & slide with the hose, bubbles and/or shaving cream. Hose them down when you're done. See a bunch of DIY slip & slides on Pinterest
  • Biking
  • Scavenger Hunt, Obstacle Course or Relay Game - see my Day Camp board on Pinterest for tons of outside games you can put together for a relay
  • Paint with Squirt Guns - Arts & crafts and physical activity in one!
  • Make bubbles - see Pinterest for a recipe for giant bubbles

Ideas for Arts & Crafts
  • As You Wish Pottery has complete kits you can pick up or they can ship to you!
  • STG Top 5 Kids Crafts - our very own!
  • Cake decorating. This is fun whether you have a lot of supplies for decorating or just a few. Each kid gets to make their own cake and then decorate it.


Ideas for Quiet Time
Whatever you decide to do this summer, take some time to relax. It's been a hard couple of months for everyone and you deserve it!

cindy


Saturday, October 21, 2017

Upcycling Goodwill Challenge - Pillows!


I have been in a serious pillow-making mood lately.  I have a pillow obsession going on my Pinterest page - check it out.  While I don't sell pillows or pillow covers in my Etsy store, Pretty Pretty Cindy, I might someday.  I am starting to sell on Sundays on my Instagram Pretty Pretty Cindy account, so follow me there.  In the meantime, I need some pillows at my house!

I have been working on our master bedroom for a while and wanted to work in some pillows on our blue/green-gray bedding.  The bedding set came with two European shams, but I wanted throw pillows for color too.  But have you seen the prices of home decorating fabric, and worse yet, pillow forms? My pillow fetish could easily break the bank.  Goodwill to the rescue!


Last month I visited our local Goodwill store on a half-price Saturday.  For only $22, I brought home the following stash:

2 26x26" European pillows
2 18x18" pillows
2 14" round pillows
2 large pieces of fabric
Large scarf (it's that pink silk in the corner)
Minky baby blanket (not shown)


Obviously I bought the pillows for the forms, but not everyone is comfortable buying used pillows.  I pick pretty carefully.  Once you get them home and remove the fabric covers, you can always spray them with a diluted bleach solution and put them in the sun.  I was lucky these pillows (while ugly) were very clean.  I think the two pieces of fabric were originally a table cloth and maybe some curtains.  By looking in slightly different places for fabric and pillow forms, I was able to engage my pillow obsession without breaking the bank!  Here's the result:


For the two big pillows in the back I used the forms from the Goodwill pillows and the shams that came with the bedding.  Buying ONE pillow form alone in a 26x26" size could cost more than $22.  I made the pillow covers on the other four pillows.  Two of the pillows came from forms I bought at Goodwill and the fabric mostly came from Goodwill.  I didn't buy any new fabric or trim for these pillows.  Isn't that awesome?  These are also all "envelope" style pillow covers, so I can remove them to dry clean or just change for a different design.  


I'll post how I made these pillows, but I will admit that I shamelessly copied designs I found on Pinterest.  

The best part - this isn't even using the whole Goodwill haul!  I still have other pillows and was able to recycle some of fabric from the Goodwill pillow covers.  Upcycle!

More pillows to come.

cindy


Sunday, March 15, 2015

When It All Starts Falling Apart

I turned 50 last month.  There, I admitted it.  Actually, I'm not that bothered by it.  It really is just a number.  However, it's undeniable that when age catches up, things start to fall apart.  It's a good thing I'm not talking about myself.

It's my house.


Our house was built in 1997 and we moved in in 2002.  It was still pretty new then and we spruced it up when we moved in.  We painted it indoors and out and installed a pool fence (after this picture was taken).


We subsequently installed pavers in the front driveway and re-landscaped the backyard, removing the pool fence for our older kids.  We had a good thing going for a while.


Then we let it go.  We stopped investing so much in the house and invested more in the family - vacations, school, activities.  I don't regret it, but hell hath no fury than a house scorned.

At first it was little things we chased - the loss of two saguaros, a new roof surface, new pool filter, getting rid of some pesky rodents.  But we weren't keeping up and now we own an 18 year old home with emerging problems.  We need new flooring.  We need major plumbing work.  We need to repaint inside.  We need new kitchen appliances.  And the list goes on and on.


Now we're just in a place where we're not sure where to start.  Our inertia is crippling us, so the house is deciding for us.  I think the refrigerator/freezer has decided to go first.  It's been threatening to stop freezing and now this weekend it has given up.  Hopefully we don't have to give up on it just yet.

So while I can claim that 50 is just an age, the same philosophy doesn't seem to be working with our house.  I can pretend all day that 18 is the new 6 for the house, but the house isn't buying it.

Maybe it's time to consider a facelift.

Cindy


Wednesday, October 16, 2013

Kitties - Blanca and LuLu

Earlier this year I wrote about Mackenzie's new cat, Lulu.  Lulu is all settled in now.  She's such a pretty cat and very sweet - from a distance.


She has a great relationship with our dogs (sometimes I think she thinks she IS a dog), and she definitely loves us from that distance.  Please don't touch me.  She loves when we feed her, when we play with her and when she can follow us around like a dog.  She is also pretty good at coming when you call her.

My husband likes Lulu, but misses the cuddly cats we had before the kids were born.  Lulu will never be the "I-love-to-sit-in-your-lap-and-sleep-next-to-your-head-at-night" kind of cat.  So when he heard of a lovable, guaranteed kissable cat who needed a new home, he volunteered.  This was HUGE - the idea that we would bring a fourth animal into the house, especially coming from Kent, was crazy.  (Mackenzie and I would be cat ladies if allowed.)  Enter Blanca:


Blanca is so different from Lulu.  She's an Oriental, so her body is longer and sleeker, she's a talker and she's a lover.  She does give genuine kisses, but she does stay on the move.  You can see her here drinking from the faucet - Lulu wouldn't get caught dead near water.  And yes, she is pure white (hence the name).

At first we were very nervous about introducing our little kitty ladies, but it turns out they have something in common - they BOTH think they are dogs.  They sniff each other (both noses and butts) and there is no hissing or growling involved.  There are a few swipes, but they are getting playful more than aggressive.  What may be even more remarkable is that they both are very comfortable with the dogs.  (I guess that shouldn't be surprising from cats that act like dogs.)

The other thing we've noticed is that each cat is getting to be a little more like the other.  Unfortunately, the small improvements we've seen with Lulu being close to us have come at the expense of Blanca becoming a little more distant.  We're still looking for the happy medium.

So now we are a family of 8 and the pets are close to outnumbering the humans.  I don't think we'll let that happen - we need to get the 8 we have comfortable under one roof.

cindy

Saturday, September 14, 2013

All About Arizona - Scorpion Season

O.K., I know that most of my "All About Arizona" posts are about the beauty and advantages of living in the Sonoran Desert.  Today's post is not one of those posts.

It's scorpion season.  Actually, in my neighborhood, most of the year is scorpion season.  We live near the open desert so they are part of deal, including the ones living in your house.  This summer has been particularly bad, probably because of the recent heavy rains we have experienced.


Here's a perfect specimen.  Small, light brown with nasty front claws and the all-important curved tail.  That little stinger over its back is what gets you.  I've been fortunate - no "tags" (I prefer my term to "stings") in the 17 years we've been here.  Unfortunately, that's not the case for my family.  My husband was tagged on the hand last summer and my daughter has been tagged three times, most recently last week as she put on her shoe (it was inside the shoe).  I'm told the feeling is like stepping on a cactus needle or shard of broken glass, but that's just the beginning.  The next 4-6 hours is pretty excruciating pain which can spread over the extremity.  After that, it's about 24 hours before the numbness goes away.  Luckily no medical attention is necessary, unless there is an allergic reaction, which is rare.

In the last 12 hours I have killed three scorpions in my home.  Two were tiny, about the size of a dime. (The one below is dead.)  The tiny ones are supposedly the worst ones.


By now you're wondering why we haven't called an exterminator.  I'm not a big fan of pesticides in the house, and frankly, they have limited effect on scorpions.  As the weather cools off, we're waiting them out because they aren't around much in the fall/winter.  Also, this year I have a secret weapon:


Those stories you hear about cats being immune to scorpions - that's pretty much true.  Actually, the theory is that cats are very fast in striking and their pads are a little too thick for a stinger to penetrate.  Whatever the reason, Lulu is an awesome scorpion hunter.  She found two of the three I've seen in the last 12 hours.  Unfortunately, she's not great at killing them, mostly because she likes to play with them too much.

So it's not all perfection here in the Sonoran Desert.  There are a few pests to deal with, but I have my cat and a little time to wait them out until the most perfect time of the year rolls around.

Hopefully no one else gets tagged before then.

cindy


Sunday, July 21, 2013

Day 19 - Great American Family Vacation - Back to Arizona!

If you've been following this travelogue for the last 19 days, thank you.  It's been an awesome odyssey, the best family vacation ever!

Our last day began in a rush to get out of Santa Fe.  We loved our long vacation, but we are all ready to get home.  Our one stop was the Painted Desert and Petrified Forest near Holbrook, Arizona.  (Please consider this the weekly "All About Arizona" because I am writing on a Saturday even if you won't see it until Sunday.)


Places all over the West are breathtaking, but Arizona will not be outdone in beauty.


At the Petrified Forest (where giant trees have turned into gorgeous quartz), we had our last hike of the trip.  Based on a deal the kids had with Kent, they have each now earned a Camelback water bottle.


After the Painted Desert, we headed downstate through the White Mountains and its gorgeous thick pines.  Weekend RV camping is sounding better and better to this family, who would never have considered staying outside of a hotel.  A typical summer monsoon thunderstorm chased us down the mountains, but it was still oh so beautiful, maybe more so because we are on the way home.

At about 6:00 p.m. we drove up to our home in the Sonoran Desert, smelly and exhausted, but happy to be home.  Tomorrow we will clean out the RV so it can be returned on Monday, Kent will go to work at church and I will get back to my job at the City of Phoenix on Monday morning.

Whew, what a trip!

cindy


Sunday, October 28, 2012

Family Wedding

Sometimes it's good to go home.  I'm getting to that middle age when you only get to see your extended family at funerals.  Last weekend we traveled to Illinois for a joyous purpose - my brother's wedding.  My four brothers and sisters, husbands and wives as well as most of their children, were there to celebrate.  We are really quite the crowd:


I didn't realize my immediate family was so big until I looked at this picture.  Not only did my immediate family attend, a good number of my cousins with their kids (and a few grandkids) showed up.  I had 23 cousins on my mother's side growing up and counting their spouses, children and grandchildren, there were 21 family members there representing the original 23.  That might not sound like a lot of family members to some people, but my cousins are scattered from Boston to Virginia, from New Orleans to Eau Claire, Wisconsin, and everything in between, especially southern Illinois.  The best part?  Because of social media, I feel like I still know what my cousins are doing most of the time.  Gotta love it.

We don't get too many chances these days to gather for occasions like weddings.  My mother was one of five girls and in the last four years, 3 of them have died, including my mother.  It's wonderful to know that even as my mother's generation is waning, their children still enjoy getting together and introducing new members of their families.  How ironic that probably the last wedding of the cousins is my brother's, the oldest cousin.

My kids were very surprised to find out how many "cousins" they have.  Here are the first cousins:


My daughter kept asking how she was related to all the other family she was meeting.  I kept repeating that they were all "cousins," some just farther removed.  During her week in Illinois, she also visited with my husband's family, including "cousins."  After we returned to Arizona, she missed being so far away from her extended family on both sides.  As the unofficial family genealogist, I was thrilled to see both of my children so interested in their family roots.

My cousins used to comment that such a large family came from the five "Wilbourn girls" (my mother and her sisters).  As we get older, our families have become very extended.  My kids and their cousins will now look to the five "Hendricks kids" as their source.


Mom and Dad would be so proud.

cindy

Thursday, September 13, 2012

Friday Coffee Date

If we were having coffee today . . .

I would tell you how I haven't really been too interested in blogging or crafting lately.  I don't usually enjoy just relaxing doing nothing, but that's all I've been doing lately

After all, I'm sitting here having coffee with you.

I worry if I don't blog more, I will lose the small audience I have.  I have so much sewing I want to do, I just can't decide where to start.

School is in full swing and we are just as busy at night as the kids are.  Every night before bed I try to think of something to write (like now), but end up falling asleep.

Maybe I need a coffee date at night.

cindy

Coffee Dates is a concept from Alissa at Rags to Stitches.  Drop by and pull up a chair every Friday - better yet, come over to Rags to Stitches and catch the whole coffee crowd.


Wednesday, September 5, 2012

Turning a Page and a Winner!

Anybody who reads this blog knows I live in Arizona.  I love living here.  I'm not a "native" in that I was born here, but anyone who has ever been to Arizona knows that my 16 years of living here entitles me to the title of "native."  One of the best things about living in Arizona is getting to travel to all the interesting parts of this state and to see the landscapes and creatures.


Saturday, July 14, 2012

Folding It Up

Everybody has household chores.  I'm lucky I have a great husband who does a lot of them.

One job that I was forced to do have is to fold the laundry and put it away after Kent washes it.

I hate folding laundry.  The only thing I hate worse than folding laundry is putting it away.  We are constantly doing laundry and it piles up.  We had to buy extra laundry baskets because we had too much laundry.  On the rare occasions when all the laundry is clean, I have nowhere to put all the clean clothes.  (How is it then that I never can find anything to wear?)

Did I mention . . .  I HATE FOLDING LAUNDRY!

Today I bit the bullet because Kent did ALL the laundry (in one day).  As of now I have all of it folded, but it's sitting on the living room floor while I "take a break".  In a minute I have to find a way to get all of our clothes crammed put away in our drawers and closets.  Gee, that's going to be fun.

I'll say it again . . . I HATE FOLDING AND PUTTING AWAY LAUNDRY!

It's keeping me from frantically running retreating to my craft room until I finish, and at the rate I'm going it will be bedtime before I get to go in there.

I REALLY HATE FOLDING AND PUTTING AWAY LAUNDRY!

Oh well, I better get back to it.  It's no big deal, right?  It's not like I hate abhor detest dislike it [wink]

cindy

Thursday, June 21, 2012

Craft Room Reveal - Sewing Area

I've been showing off parts of my Craft Room over the past few weeks and today I want to show you the part that is near and dear to my heart.  It's the sewing area.


It's really one entire side of the room, across from the scrapbook area.  I love JoAnn's generally, but really regret two (expensive) purchases I have in my craft room.  First, this sewing table - almost $200.  It's small, and the drawers don't open well.  The other thing that is more frustrating (especially tonight) is the ribbon storage unit I bought.  It wasn't well made and I struggled with it until I finally gave up tonight.  (See my solution below).  I am happy with the painted pails that hold needles, bobbins, pins and buttons.


This is the corner next to the main sewing table.  It has my serger and some items I bought at a garage sale. I'm using the lanterns for supplies for headband making and elastic.


As of tonight it is also storing my ribbon after the epic fail of the ribbon holder.  I have some styrofoam balls recycled from Christmas ornaments that I used in another craft.  I took the dowel rods from the ribbon holder and sunk them vertically into the balls.  I put the ribbon on and lined them up on the table shelf.  (BTW, that little table was made by my dad in high school back in the 1940s.)


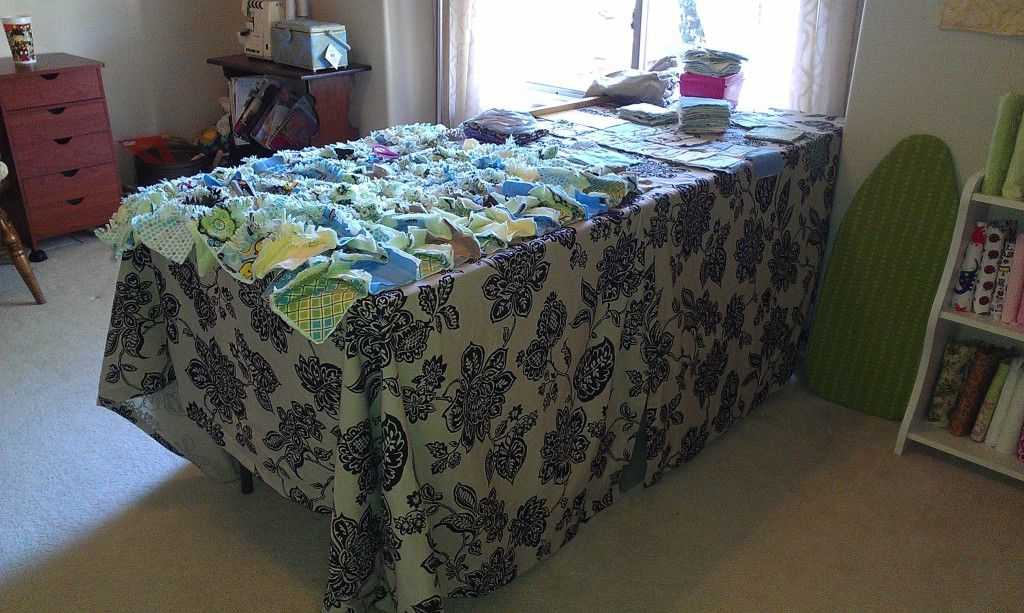
This is my cutting table.  I bought it at a Blockbuster that was closing for $30.  It's 6 feet long with a durable plastic top.  I covered it with two curtains I bought on sale at Target.  I covered it so I could use the area underneath for bin storage for scrap fabric and yarn.  It works really well with a plastic cutting mat on top of the fabric cover.


Last but not least is my fabric storage.  I described the shelf fabric storage in another post, but I've combined it with the shelves in my closet.  I've said it before, but I'll say it again - I have too much fabric and need to start using it before I buy anymore.


So, that's it!  It is my new favorite place - where my family knows I'm at when they can't find me.  Yep, I have everything but a bed in here.  Let the creativity begin in earnest!

cindy

Monday, June 11, 2012

Scrapbook Station

I've been so busy trying to finish a few projects before opening the Etsy store (Pretty Pretty Cindy), I haven't had time to post, but I'm excited about showing one of the best parts of the new craft room - the scrapbook station.

 I started with this armoire/computer station which I didn't want to move out of the room.  The first challenge was getting the corkboard to stick to the back of the cabinet. After a lot of fits and starts, I came up with VELCRO!

Next was finding a place for all my stamps.  This cabinet has a double pull out tray, one for the computer keyboard and the other a work area.  I used the computer keyboard tray, put on some non-stick/non-slip shelf liner and arranged the stamps in a small antique drawer in a way I can see them all.


Next, I had this old two-sided hanging thing for jewely. I turned it into a sticker/embellishment holder. Again, I can see everything and it's double sided!


I moved on to these plastic baskets I found at Goodwill and attached them to the corkboard with push pins -perfect for little items.


I used an old letter holder to keep bigger items.

I found these 4 glass candle holders at a garage sale and turned them into cute storage for ribbon and adhesives.


I bought a scrapbook/photo album and used it to keep all my letter stickers. You guessed it, I can see them all.  If you have a lot of letters, buy two books -mine is a little too full.


This was the one item I splurged on - a turning caddy. I bought it at Michaels, but I used a 50% off coupon to make the sticker shock go away.


I bought some pretty baskets at Michaels (on sale) and stored assorted items I want to keep out of sight.  An extra bonus is that the shelves are just a little deeper than the baskets, so when I pull out the basket, I can tilt it on the drawer so it stays accessible while I look through it.


Here's another item I am proud of.  I converted a shoe keeper we never used, took out a divider and it became instant paper storage!  I've heard that the best way to store paper is upright, but I'm not sure how to to that.  I did spend a tremendous amount of time sorting the paper by color.  You're looking at about 30 pounds (or more) of paper.  I need to give some away because I couldn't possibly use it all.


Well, that's it.  Here's the funny thing - although I have a good amount of scrapbooking stuff, I don't really get a chance to scrapbook much.  I've always worked out of travel containers on the dining room table.  My kids are 9 and 11, but in their scrapbooks they are 1 and 3.  I have more scrapbooking on my project list for June.  Now that I have an awesome place to work, maybe I'll get inspired.

cindy

Friday, June 8, 2012

Craft Room Reveal!

The day is finally here - my new craft room is DONE!!  I've been working in there and I love it.  Over the next couple of weeks, I'll show some detailed features of the new craft room, but in the meantime, here's some before, during and after pictures:
BEFORE

DURING

AFTER


I have too much fabric!

BEFORE

DURING

AFTER


My new cutting table where the couch (and mess) used to be.  There is storage under the table for scrap fabrics and extra yarn in bins.  The table cover is made from two curtain panels from Target.  The beer can collection is gone!


BEFORE

DURING

AFTER


Finally, a functional sewing area!  Now I don't have to drag my sewing projects into the dining room and keep them spread out for weeks at a time.  My favorite part of the room.

BEFORE

AFTER


I'm really proud of this part.  I've never had a place to scrapbook and now I have a scrapbook section of the room!  This was another big revelation - I have WAYYY too much paper!  I think I have enough for 20 scrapbooks, maybe more!

So there it is!  I'm so happy it's done, and frankly, so is my family.  It's my very own room for creativity.  Over the next couple weeks, I'll show all the sections of the room and how I organized them.

cindy