Showing posts with label Decorating. Show all posts

Saturday, October 21, 2017

Upcycling Goodwill Challenge - Pillows!


I have been in a serious pillow-making mood lately.  I have a pillow obsession going on my Pinterest page - check it out.  While I don't sell pillows or pillow covers in my Etsy store, Pretty Pretty Cindy, I might someday.  I am starting to sell on Sundays on my Instagram Pretty Pretty Cindy account, so follow me there.  In the meantime, I need some pillows at my house!

I have been working on our master bedroom for a while and wanted to work in some pillows on our blue/green-gray bedding.  The bedding set came with two European shams, but I wanted throw pillows for color too.  But have you seen the prices of home decorating fabric, and worse yet, pillow forms? My pillow fetish could easily break the bank.  Goodwill to the rescue!


Last month I visited our local Goodwill store on a half-price Saturday.  For only $22, I brought home the following stash:

2 26x26" European pillows
2 18x18" pillows
2 14" round pillows
2 large pieces of fabric
Large scarf (it's that pink silk in the corner)
Minky baby blanket (not shown)


Obviously I bought the pillows for the forms, but not everyone is comfortable buying used pillows.  I pick pretty carefully.  Once you get them home and remove the fabric covers, you can always spray them with a diluted bleach solution and put them in the sun.  I was lucky these pillows (while ugly) were very clean.  I think the two pieces of fabric were originally a table cloth and maybe some curtains.  By looking in slightly different places for fabric and pillow forms, I was able to engage my pillow obsession without breaking the bank!  Here's the result:


For the two big pillows in the back I used the forms from the Goodwill pillows and the shams that came with the bedding.  Buying ONE pillow form alone in a 26x26" size could cost more than $22.  I made the pillow covers on the other four pillows.  Two of the pillows came from forms I bought at Goodwill and the fabric mostly came from Goodwill.  I didn't buy any new fabric or trim for these pillows.  Isn't that awesome?  These are also all "envelope" style pillow covers, so I can remove them to dry clean or just change for a different design.  


I'll post how I made these pillows, but I will admit that I shamelessly copied designs I found on Pinterest.  

The best part - this isn't even using the whole Goodwill haul!  I still have other pillows and was able to recycle some of fabric from the Goodwill pillow covers.  Upcycle!

More pillows to come.

cindy


Friday, July 29, 2016

Dorm Decorating Tips


If you've read some of my other College Week posts, you know I was in college in the Stone Age.  (This is a picture of the Quad at my fabulous alma mater - the University of Illinois.)  While some things have changed, most dorm rooms have not.  For each person in the room, there is a bed, desk, chair and usually a wardrobe or closet.  My freshman year, I lived in a triple - yes, that is 3 women in a room.  No, the room wasn't much bigger.  Decorating a dorm room can be daunting, but there are two basic rules to remember:

1.  A dorm room is SMALL so don't cram too much into it.
2.  Decorating decisions need to include your roommate(s).

If you get these basic concepts, the rest flows from there.  Hopefully, you will wait to decide on decorating details until after you are at school, but most freshmen just can't help themselves.  Consulting with your new roommate over the summer is a great idea (fits criteria 2), but without seeing your new room, it might be hard to meet criteria 1.

You can find lots of examples of great dorm rooms online and I've collected over 100 pins on my board Dorm DIY on Pinterest.  For now, I just want to make a couple of points about dorm room decorating.  Click on any of the pictures to see more information about organization or decorating:

1.  Maximize the use of space - including airspace.  Raising your bed is a great idea.  If you can get the bed high enough, you can put your desk underneath.  Make sure to check your school's policies on this and make sure you are being safe.  Here's a great example and a well done blog post from Bottled Creativity


2.  A dorm room is not as big as your room at home - unless you live in a trailer.  Unless you share a room in a trailer with someone else, your room at home doesn't have two beds, two desks, two chairs and two closets. Don't try to copy pictures of rooms that are clearly bigger than your dorm room.  Wait until you get to school and take a careful look at what you have.  Check out Seven Ways to Make Your Dorm Room Seem Bigger from The Odyssey Online.


3.  Keep it functional.  Don't bring in extra furniture - really.  It might be cute, but not so much when you are tripping over it in the middle of the night.  You can have a beautiful and functional room without extra furniture - really.  Here's some great ideas for 15 Essential Products You Need for Your Dorm (but might forget) from StudyBlue.


4.  NO CLUTTER.  There are lots of cool products - shelving, storage bins, side tables, etc.  Clutter makes your room look messy, unorganized, and, if it's possible, smaller than it actually is.  Leave the knick-knacks at home.  There are several pins about organization on my Pinterest board Dorm DIY, but here's a really good piece from abell Organizing


5.  Talk to your roommate and coordinate.  You both might have great taste, but it isn't fun to have different decorating themes in one little room.  Compromise - you're just getting started.  Everyday you come in to see a schizophrenic room, it will remind you that you and your roommate can't compromise.  Here's some themes from Society19


6.  If you or your roommate intend to study, relax or sleep in your dorm room, don't plaster the walls with thousands of high school pictures and then hang Christmas lights around it.  It's not only tacky, it is very distracting and certainly not conducive to concentration or relaxation. Of course, you will see plenty of pictures of dorms online that will feature these, so obviously people can disagree about this one.

7.  Make your function pretty.  You can have some storage under your bed that looks good.  You can add some nice curtains that keep the excess light out while masking those ugly blinds.  If you would like extra seating, turn a storage bin into an ottoman. (But not two in the middle of the room!)  Check out the Top Dorm Bedding Ideas from Society19


8.  Get a nice rug, but consider throw rugs instead of bigger carpeting pieces.  Your carpet will likely never see a vacuum unless one is available for common use in the dorm.  However, a throw rug can be washed.

9.  Use light colors.  When winter comes and you get stir crazy in your little dorm room, you won't want to be surrounded by dark colors covering the walls and your bed.  Just like dark paint, dark decorations dominating the bed and walls will make your little dorm room smaller.

10.  Keep it clean!  At the risk of sounding like your mom, a clean room will keep you and your roommate happy.  Just like a happy wife, a happy roommate makes for a happy college life

Still looking for ideas?  Don't miss this post from GradGuard: 5 Best Dorm Decor Blogs.  Don't forget to check out my Pinterest boards Dorm DIY and College for more college ideas!

cindy


Saturday, August 15, 2015

College Week - Dorm Room DIY

I could not let the end of College Week go by without a DIY day.  There are some really cute college DIY projects out there, and I think my teen daughter and I will be trying a few for her room (not in college).  While I haven't tried any of these specific projects, here's a short list of projects that will personalize your room without compromising functionality.  Click on the title for the specific DIY instructions and be sure to visit the fine DIYer who brought you the product (and the picture):

1.     Storage cube ottoman - This is the cutest design from The Eager Teacher.  These would be ideal tucked under your bed for storage and brought out when you have extra guests or need a foot rest.  Two notes - make sure the store bought crates will support your weight and consider a fabric loop/tab to stick out on the side of the cushion so you can easily access the storage space in the crate.


2.     Frame jewelry/picture hanger - From the UK, Love Chic Living describes this as a way to make an easy photo collage.  I think it's cute as that, but would also be a great way to hang your jewelry, especially if you added a little background cork for earrings.  You can find the little "clothes pins" at Michaels.


3.     Shoebox Charging Station - I really liked this one from Country Living because (A) it's easy; and (B) it's functional.  One thing I would note - you should probably leave the lid of the box open when you are charging your items so it doesn't overheat and be sure to unplug fully charged devices (your manufacturer's instructions for your electronics will tell you that part too).  I also would not use this for a full-size laptop because the cords are bulkier and they definitely get hot.


4.     Frame organization/note board/calendar - There are a ton of variations of this project, but the concept is pretty simple - picture frame, paper/fabric background in frame and dry erase pen to use on the glass.  However, this one from Tangles and Tangents was super cute and had great instructions.


5.     Ping pong lights - I'm not a huge fan of the Christmas-lights-in-the-dorm-room look, but I know it's popular and this way of doing it from Say Yes is at least a little original. (I would never put these over a crib, but your bed is OK)


This is just a small sampling of DIY projects I found for your dorm.  You can see lots more on my Pinterest board "Dorm DIY"

Happy DIY decorating!

cindy


Wednesday, August 12, 2015

Decorating the Dorm Room - A Few Hints

If you've read some of my other College Week posts, you know I was in college in the Stone Age.  While some things have changed, most dorm rooms have not.  For each person in the room, there is a bed, desk, chair and usually a wardrobe or closet.  My freshman year, I lived in a triple - yes, that is 3 women in a room.  No, the room wasn't much bigger.  Decorating a dorm room can be daunting, but there are two basic rules to remember:

1.  A dorm room is SMALL so don't cram too much into it.
2.  Decorating decisions need to include your roommate(s).

If you get these basic concepts, the rest flows from there.  Hopefully, you will wait to decide on decorating details until after you are at school, but most freshmen just can't help themselves.  Consulting with your new roommate over the summer is a great idea (fits criteria 2), but without seeing your new room, it might be hard to meet criteria 1.

You can find lots of examples of great dorm rooms online and I've collected a lot of pictures and tips on my board Dorm Decorating on Pinterest.  For now, I just want to make a couple of points about dorm room decorating:

1.  Maximize the use of space - including airspace.  Raising your bed it a great idea.  If you can get the bed high enough, you can put your desk underneath.  Make sure to check your school's policies on this and make sure you are being safe.


2.  A dorm room is not as big as your room at home - unless you live in a trailer.  Unless you share a room in a trailer with someone else, your room at home doesn't have two beds, two desks, two chairs and two closets. Don't try to copy pictures of rooms that are clearly bigger than your dorm room.  Wait until you get to school and take a careful look at what you have.


3.  Keep it functional.  Don't bring in extra furniture - really.  It might be cute, but not so much when you are tripping over it in the middle of the night.  You can have a beautiful and functional room without extra furniture - really.


4.  NO CLUTTER.  There are lots of cool products - shelving, storage bins, side tables, etc.  Clutter makes your room look messy, unorganized, and, if it's possible, smaller than it actually is.  Leave the knick-knacks at home.


5.  Talk to your roommate and coordinate.  You both might have great taste, but it isn't fun to have different decorating themes in one little room.  Compromise - you're just getting started.  Everyday you come in to see a schizophrenic room, it will remind you that you and your roommate can't compromise.

6.  If you or your roommate intend to study, relax or sleep in your dorm room, don't plaster the walls with thousands of high school pictures and then hang Christmas lights around it.  See above.  It's not only tacky, it is very distracting and certainly not condusive to concentration or relaxation. 

7.  Make your function pretty.  You can have some storage under your bed that looks good.  You can add some nice curtains that keep the excess light out while masking those ugly blinds.  If you would like extra seating, turn a storage bin into an ottoman. (But not two in the middle of the room!)

8.  Get a nice rug, but consider throw rugs instead of bigger carpeting pieces.  Your carpet will likely never see a vacuum unless one is available for common use in the dorm.  However, a throw rug can be washed.

9.  Use light colors.  When winter comes and you get stir crazy in your little dorm room, you won't want to be surrounded by dark colors covering the walls and your bed.  Just like dark paint, dark decorations dominating the bed and walls will make your little dorm room smaller.

10.  Keep it clean!  At the risk of sounding like your mom, a clean room will keep you and your roommate happy.  Just like a happy wife, a happy roommate makes for a happy college life!


Don't forget to check out my Pinterest account for more college ideas!

cindy


Thursday, December 13, 2012

Christmas Comfort


We're finally putting up our Christmas decorations, and once again I feel a sense of comfort and familiarity.  I don't know about anyone else, but I put my decorations in the same place every year.  I tend to group similar items together.  Snowmen go in the kitchen, nativity scenes on the piano, and angels on the bar.

Some of my favorite decorations are in the main bathroom where the Santas live.  I can look at every decoration and remember where I bought or received it.  Here's my favorite:


I still have a hard time looking at these guys without laughing.  Their looks seem to question why they are there.  I also have this cute Santa and Mrs. Claus.


I bought these about 12 years ago at a craft fair at my church.  The woman who made them subsequently died from cancer and her husband loved hearing that I still had her creations and displayed them every year.  Santa has to lean on the Santa candle because he can't stand on his own, but I can't imagine decorating this room without him.

One of my newer areas is my bar adored with angels.


This is one of my favorite angels that I bought about 5 years ago at of all places, a copper mine.


It makes me feel good putting all of these pieces in the same places every year.  I guess it reminds me of Christmases past (or I'm just too lazy to think of a different way to decorate).  Either way, it's part of the comfort of Christmas.

cindy

Thursday, August 16, 2012

The Jewel of the Desert

Last week I attended a legal conference on water law.  The conference was fairly mundane, my third consecutive year of attending this conference.  The one thing I look forward to every year is that the conference is at the Arizona Biltmore, the Jewel of the Desert.

If you have never visited or seen pictures of this world famous five star resort, it is an architectural dream.  It opened in 1929, seven months before the Stock Market crash that began the Great Depression.  It's unmatched character is the heavy influence of Frank Lloyd Wright both then and now.  It is timeless.


The entire structure is made from pre-cast concrete block, made on site and known as "Biltmore Block."  The strong geometric lines were designed by a student of Frank Lloyd Wright.  (Not many people know that Wright had a school of architecture - Taliesin West - in what is now Scottsdale.  He was not a stranger to the desert.)  Everything in the hotel follows these lines, from the mission furniture to the light fixtures down to the carpet.  It's like a step back in time.


Movie stars and politicians could be seen at the Biltmore pool; Marilyn Monroe called it her favorite pool.  My claim to fame is that my niece and nephew have each worked poolside at the Biltmore, my niece fetching towels and my nephew regulating kids going down the slide :-)


Every President since Herbert Hoover (in office when the Biltmore opened) has stayed at the Arizona Biltmore (with the exception of the current President).  There is a cool hallway off the lobby that has a picture of each President at the Biltmore, usually on the golf course.


So many people think Phoenix is a recent oasis that popped out the desert, but it truly does have a history.  A living testament to that history is the Arizona Biltmore.  If you visit Phoenix, or just live in the area and have never seen it, its a jewel in the desert you cannot miss.

A disclaimer - I did NOT receive any compensation, consideration or even recognition from the Arizona Biltmore for writing this post.  (I did use historical pictures from its website, but the current pictures are mine.)  I love history, this is Arizona history, and the opinions expressed here are my own.

cindy

Thursday, June 21, 2012

Craft Room Reveal - Sewing Area

I've been showing off parts of my Craft Room over the past few weeks and today I want to show you the part that is near and dear to my heart.  It's the sewing area.


It's really one entire side of the room, across from the scrapbook area.  I love JoAnn's generally, but really regret two (expensive) purchases I have in my craft room.  First, this sewing table - almost $200.  It's small, and the drawers don't open well.  The other thing that is more frustrating (especially tonight) is the ribbon storage unit I bought.  It wasn't well made and I struggled with it until I finally gave up tonight.  (See my solution below).  I am happy with the painted pails that hold needles, bobbins, pins and buttons.


This is the corner next to the main sewing table.  It has my serger and some items I bought at a garage sale. I'm using the lanterns for supplies for headband making and elastic.


As of tonight it is also storing my ribbon after the epic fail of the ribbon holder.  I have some styrofoam balls recycled from Christmas ornaments that I used in another craft.  I took the dowel rods from the ribbon holder and sunk them vertically into the balls.  I put the ribbon on and lined them up on the table shelf.  (BTW, that little table was made by my dad in high school back in the 1940s.)


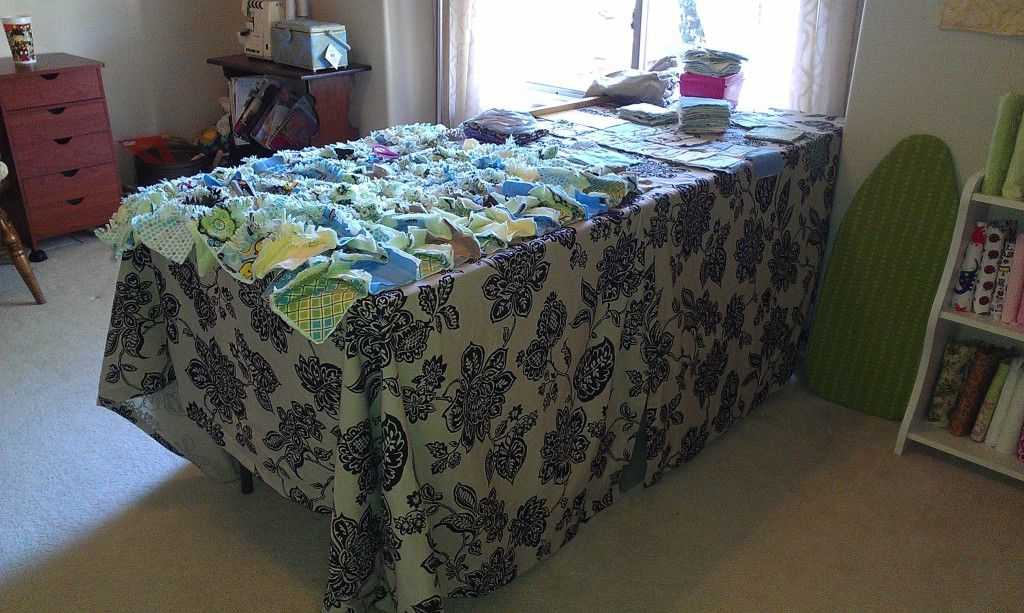
This is my cutting table.  I bought it at a Blockbuster that was closing for $30.  It's 6 feet long with a durable plastic top.  I covered it with two curtains I bought on sale at Target.  I covered it so I could use the area underneath for bin storage for scrap fabric and yarn.  It works really well with a plastic cutting mat on top of the fabric cover.


Last but not least is my fabric storage.  I described the shelf fabric storage in another post, but I've combined it with the shelves in my closet.  I've said it before, but I'll say it again - I have too much fabric and need to start using it before I buy anymore.


So, that's it!  It is my new favorite place - where my family knows I'm at when they can't find me.  Yep, I have everything but a bed in here.  Let the creativity begin in earnest!

cindy

Monday, June 11, 2012

Scrapbook Station

I've been so busy trying to finish a few projects before opening the Etsy store (Pretty Pretty Cindy), I haven't had time to post, but I'm excited about showing one of the best parts of the new craft room - the scrapbook station.

 I started with this armoire/computer station which I didn't want to move out of the room.  The first challenge was getting the corkboard to stick to the back of the cabinet. After a lot of fits and starts, I came up with VELCRO!

Next was finding a place for all my stamps.  This cabinet has a double pull out tray, one for the computer keyboard and the other a work area.  I used the computer keyboard tray, put on some non-stick/non-slip shelf liner and arranged the stamps in a small antique drawer in a way I can see them all.


Next, I had this old two-sided hanging thing for jewely. I turned it into a sticker/embellishment holder. Again, I can see everything and it's double sided!


I moved on to these plastic baskets I found at Goodwill and attached them to the corkboard with push pins -perfect for little items.


I used an old letter holder to keep bigger items.

I found these 4 glass candle holders at a garage sale and turned them into cute storage for ribbon and adhesives.


I bought a scrapbook/photo album and used it to keep all my letter stickers. You guessed it, I can see them all.  If you have a lot of letters, buy two books -mine is a little too full.


This was the one item I splurged on - a turning caddy. I bought it at Michaels, but I used a 50% off coupon to make the sticker shock go away.


I bought some pretty baskets at Michaels (on sale) and stored assorted items I want to keep out of sight.  An extra bonus is that the shelves are just a little deeper than the baskets, so when I pull out the basket, I can tilt it on the drawer so it stays accessible while I look through it.


Here's another item I am proud of.  I converted a shoe keeper we never used, took out a divider and it became instant paper storage!  I've heard that the best way to store paper is upright, but I'm not sure how to to that.  I did spend a tremendous amount of time sorting the paper by color.  You're looking at about 30 pounds (or more) of paper.  I need to give some away because I couldn't possibly use it all.


Well, that's it.  Here's the funny thing - although I have a good amount of scrapbooking stuff, I don't really get a chance to scrapbook much.  I've always worked out of travel containers on the dining room table.  My kids are 9 and 11, but in their scrapbooks they are 1 and 3.  I have more scrapbooking on my project list for June.  Now that I have an awesome place to work, maybe I'll get inspired.

cindy