
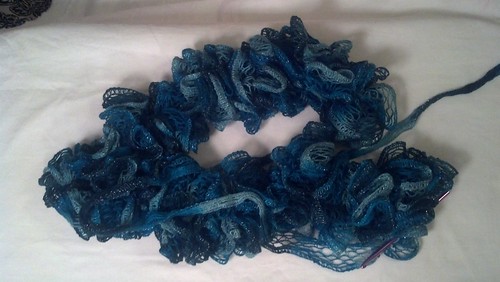
For this scarf I used Red Heart Boutique Sashay in the color Jive. Red Heart has 22 ombre and multi-color versions of Sashay. It has a fishnet look. You can use a crochet hook J through L (your choice). You will find in this tutorial that there are very few rules about using Sashay because it's hard to make a mistake.
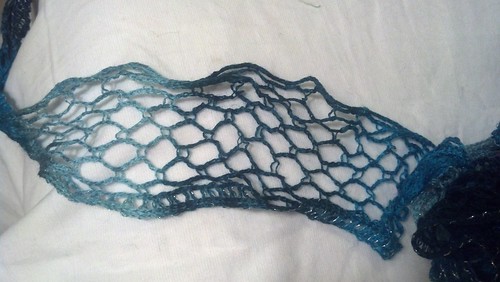
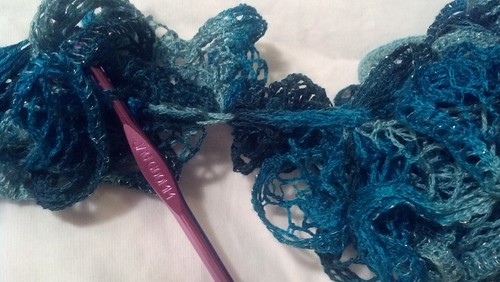
To start, you need to spread the yarn (I can't think of another word) out so you can see the netting. Notice at the bottom there is a tighter weave that looks like a ladder? That is the bottom and you will NOT crochet through it. You can also notice that it has some metallic threads in that part.
Next, you can tie a knot in the end to begin. Get it nice and tight. Put your hook through a part of the knot and begin chaining. Use the very top holes along the opposite side of the "ladder" and skip every other hole. Just chain, and always go from front to back. It will feel like you are making yarn over (YO) every time. For purposes of this tutorial I will use the word "chain" instead of YO.

For my scarf I chain 15 loops on the hook, skipping every other hole on the very top. That should leave you with 15 loops on your hook, like this:
If you have a few more or a few less loops, it's no big deal. It's actually your preference, but the more loops, the longer/deeper your ruffles will be. Once you get the 15 loops on the hook, pull the last loop hooked back through the other loops. This can be tricky with this yarn, so I suggest the "cheating" method. Instead of trying to pull the loop back through the others, just hold the hook straight and use your fingers to move the other loops over the last loop. Whatever works for you is fine.
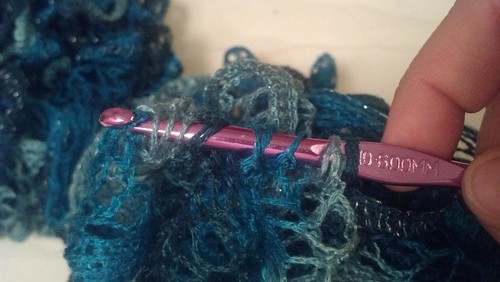
The next part is the only step I think you must do. After pulling the single loop back through the others, secure it by using the next loop on the yarn and slip stitch it back through the one loop left on your hook. This will keep your scarf from quickly unraveling if you drop the next loops.
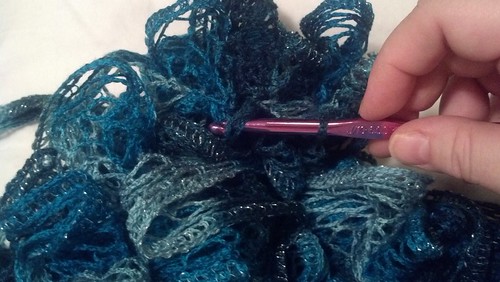
For the next set of loops I like to use the loops that are just under the top loop. This provides a little more support to the scarf. When you hook these loops it will look like two strands on the hook. Do 10 of these and pull the last loop on the hook back through the others. Finally, repeat the first step - 15 loops using the top loop of the yarn. So here's where we are so far:
Tie the end
Push your hook through the tied end
Chain 15 of the top loop and pull the last loop back through the others.
Secure with a slip stitch
Chain 10 of the loops just under the top loop of the yarn and pull the last look back through.
Secure with a slip stitch
Chain 15 of the top loop and pull the last loop back through the others.
Secure with a slip stitch.
After repeating this sequence a couple of times, you can look back at your scarf and see this:
The next part is the only step I think you must do. After pulling the single loop back through the others, secure it by using the next loop on the yarn and slip stitch it back through the one loop left on your hook. This will keep your scarf from quickly unraveling if you drop the next loops.
For the next set of loops I like to use the loops that are just under the top loop. This provides a little more support to the scarf. When you hook these loops it will look like two strands on the hook. Do 10 of these and pull the last loop on the hook back through the others. Finally, repeat the first step - 15 loops using the top loop of the yarn. So here's where we are so far:
Tie the end
Push your hook through the tied end
Chain 15 of the top loop and pull the last loop back through the others.
Secure with a slip stitch
Chain 10 of the loops just under the top loop of the yarn and pull the last look back through.
Secure with a slip stitch
Chain 15 of the top loop and pull the last loop back through the others.
Secure with a slip stitch.
After repeating this sequence a couple of times, you can look back at your scarf and see this:
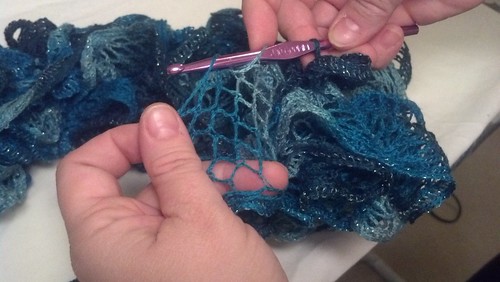
Decision time. If you don't mind the fullness of the ruffles like this, or want a lighter weight scarf, keep repeating the steps above. With that method you should be able to make a complete scarf with 1 skein of Sashay. However, I wanted a heavier, more substantial scarf this time, so I added the following step. With the single loop on your hook go back about halfway down this line of chains you already did and slip stitch through one of the tighter loops. In the picture above, it would be about dead center. There is no specific part of the chain to do this in, so don't worry about finding the right loop. If you choose this method, it will look like this:
Continue on, repeating all the chains above (and going back to slip stitch if you would like). When you get to your desired length, cut the yarn and make a knot by pulling the remaining yarn through the last loop in a slip stitch. Tie another knot, cut off the excess and voila! You're done!!
Once you get the hang of these, you can whip them out in an hour or two. Great gifts and accessories for your wardrobe.
Come back next time (which should be tomorrow God and technology willing) and see a totally different kind of scarf made from fabric! In fact, it's an upcycle project, which is my new favorite method of sewing/crafting for 2013.
cindy
No comments:
Post a Comment
I love comments and read every one, so please let me know what you're thinking.