Showing posts with label recipe. Show all posts

Saturday, November 3, 2018

Chocolate Kiss Pie


Looking for a dessert to take to your next dinner party or just a quick "hello" for neighbors?  Here is a recipe that is very quick and easy.  The only real requirement is that you need to give it enough time to set in the refrigerator.  This yummy dessert only requires a few ingredients

1 1/2 cup Whole milk
1 small box 3.6 oz EACH of Devil's Food and White Chocolate Pudding
(I found Godiva brand!!)
1 8oz tub Cool Whip
1 6oz graham cracker crust
1 bag of Hershey Kisses


Pour 3/4 cup of milk into bowl and add chocolate pudding mix.  Whisk for 1 minute.  Stir in 1/2 of Cool Whip and spoon into crust.  Refrigerate for at least an hour.  Repeat the process with the white chocolate pudding mix and stir in the remainder of the Cool Whip.  Layer on top of set chocolate layer.  Refrigerate for addition hour (preferably more).  After fully set and shortly before serving, place unwrapped kisses over the top of the pie.  Serve cold.

Enjoy!

cindy

Thursday, July 12, 2018

Chicken Lettuce Wraps Recipe


I work full time outside of the home and last week I came home to the most amazing aroma!  My husband found this awesome recipe online.  It was so good, we had to repeat it again tonight - and it was even better the second time!!  It tastes just like those fabulous yummy appetizers you get at that famous Asian restaurant (clue - the name is on the picture).

Ingredients

1 Tablespoon olive oil
1 pound ground chicken
2 cloves minced garlic
1 diced onion
1/4 cut hoisin sauce
2 Tablespoons soy sauce
1 Tablespoon rice wine vinegar
1 Tablespoon freshly grated ginger
1 Tablespoon Sriracha (optional)
1 (8 ounce) can diced water chestnuts
2 chopped green onions
salt and pepper to taste
butter or iceberg lettuce

We started by boiling boneless chicken breasts and then running them through a food processor after they cooled a bit.  Be careful not to overdo it, or your chicken consistency will be too fine.  Heat the olive oil in a saucepan over medium high heat.  Add ground chicken and cook until browned, about 3-5 minutes, making sure to crumble the chicken as it cooks; drain the excess fat.  

Stir in garlic, onion, hoisin sauce, soy sauce, rice wine vinegar, ginger and Sriracha until onions are translucent, about 1-2 minutes.  Stir in the diced chestnuts and green onions until tender, about 1-2 minutes; season with salt and pepper.

Spoon into individual lettuce leaves.  This is also great with tortillas, crackers, or on little slices of bread as a cute appetizer.  Add a kick to your scrambled eggs the following morning!  It reheats almost as good as when you first made it!  

cindy


Saturday, March 24, 2018

Pinterest Try-It - Lemon Brownies

Here's a great recipe from "Gonna Want Seconds" that I found on Pinterest.  (If you are the one person left that is NOT on Pinterest, run, don't walk and get an account.  It's a life changer.)


It's that time of year when I'm trying to get rid of the last lemons on my tree and this recipe is SOO easy and yummy, you have no excuse not to try it.  These are not the same as Lemon Squares, which have a more gooey consistency. The consistency of these is really more like soft chewy brownies. In fact, if you prefer your brownies slightly more cake-like, add a 1/4 tsp of baking powder to this recipe.  I like mine chewy!

Ingredients
3/4 cup flour
3/4 cup sugar
1/4 tsp. salt
1 stick (1/2 c.) butter, softened
2 eggs
2 Tbl. lemon zest
2 Tbl. lemon juice

Glaze
1 c. powdered sugar
3 Tbl. lemon juice
2-3 Tbl. lemon zest


Preheat oven to 350 degrees.  Line an 8x8" baking dish with aluminum foil.  Use 2 pieces, so there is overlap on all sides.  Spray a non-stick spray on the aluminum foil.  This is an important step that I was so thankful for when I read the original recipe.

Combine flour, sugar, salt and butter and beat until combined.  I softened my butter in the microwave first so the combination would be smooth.


In a separate bowl, combine eggs, lemon juice and lemon zest.  Use a fine grater for the zest and don't grate beyond the white rind on the lemons.  That way your zest is just yellow and not bitter.


Pour the egg mixture into the flour/sugar mixture and beat on medium speed for 2 minutes.  Pour the mixture into the lined pan and bake for 20-25 minutes.  (You can do a toothpick test to check if they are done.)  Cool the brownies COMPLETELY before you glaze them.


Once the brownies are cool, combine the powdered sugar with half of the lemon juice (1.5 Tbl), stirring as you do.  Add the remaining lemon juice.  You want a thick, but pourable consistency with the glaze.  Apply the glaze to the brownies.  Sprinkle the remaining lemon zest over the top. 

I agree with the original recipe that your best bet is to refrigerate the glazed brownies overnight BEFORE cutting them or even removing them from the pan.  These are awesome cold.

That's it!  Super yummy, but be prepared to make several batches of these because they will go fast!

cindy


Monday, March 27, 2017

Lemon Blueberry Cake

I promise - last lemon use.  But this is a really good one - Lemon Blueberry Cake.


I first saw this as one of those Delish videos on Facebook and I just had to try it.  This was absolutely the best cake I have ever made from scratch (although I can't say I've made too many).  The recipe comes from Natasha's Kitchen, although I did modify it a bit based on the baking pan.  Her original recipe called for a springform pan, but I don't own one.  I do own a tube bundt cake pan, and based on the modification of her recipe, I was able to create this yummy cake. 


If you are a more serious baker and have a springform pan, use the link above to find her recipe.  If you are using a bundt pan, here's how to make this awesome cake:

Ingredients
3 large eggs
1 1/2 c. granulated sugar
1 1/2 c. (12 oz.) sour cream
3/4 c. light olive oil or vegetable oil (I used olive oil)
1 1/2 tsp. vanilla extract
1/2 tsp. salt
3 c. all purpose flour
3 tsp. baking powder
2 Tbl. lemon juice
Zest of 1-2 lemons (1 Tbl.)
3/4 Tbl. corn starch
18 oz. (3 pint containers) blueberries*
Powdered sugar to dust top

*Natasha warns against using too many blueberries because it gets too heavy at the bottom.

Preheat oven to 375 degrees and lightly grease the pan with cooking spray.  Beat the eggs and sugar with an electric mixer until thoroughly blended.  Add the sour cream, oil, vanilla and salt and beat until smooth.


Mix the flour and baking powder together and slowly add to egg mixture, about 1/3 at a time until completely blended.  Add a tablespoon of lemon juice and lemon zest and blend.

Rinse the blueberries and in a separate bowl, gently toss them with the cornstarch and the other 1 tablespoon of lemon juice. 

Spoon about 1/2 of the batter into the bottom of the greased pan and then layer the blueberries on top.  Repeat with the remaining batter and berries so you end up like this:


Bake for 55 minutes and after the pan has cooled a little, gently flip it over onto a plate. Sprinkle with powdered sugar.


This cake makes a great coffee/pound type cake.  If you do use a springform pan or frozen blueberries, check Natasha's Kitchen for the correct measurements.  By using the bundt tube pan, I had to increase the quantities of the ingredients.

We will definitely be making this cake again, certainly in the early Spring when our lemons are abundant and blueberries from Chile are plentiful!  Enjoy!

cindy


Saturday, March 11, 2017

If Life Gives You Lemons

You know it - make lemonade!

A while back I posted a picture of our lemon tree here.  That was back in February and since that time I have made pounds of lemon bars, cleaned multiple times with lemons, freshened the garbage disposal, and yes, made lemonade.  I still haven't made a dent on that tree.  I am making a very gallant effort though.

I can't claim credit for this lemonade recipe - it comes from Paula Deen.  However, it is very simple to remember.  Two cups of sugar/two cups of lemon juice and a gallon of water.  What makes this recipe perfect every time is a trick I call - start HOT and end COLD.  Anyway, here's the recipe:


2 c. sugar (or Stevia/Truvia or other measure for measure sugar substitute)
2 c. fresh lemon juice
1 c. hot water
enough water to fill remainder of 1 gallon container
ice

Put the 2 cups of sugar in the bottom of a dry gallon pitcher.  You can use all sugar substitute instead of sugar as long as it is the kind suitable for baking (i.e. Stevia).  I personally think using all sugar substitute adds a little bitter aftertaste, but it isn't overwhelming.  Recently, I've been combining 1 cup sugar with 1 cup sugar substitute because I'm trying to cut back on sugar.  I didn't notice any difference in taste.  If you don't have a problem with sugar, by all means use all sugar.

Here's the HOT part that is genius.  Heat 1 cup of water and add it to the pitcher with the sugar (or sugar substitute) and stir until completely dissolved.  As a kid, one thing I always hated about lemonade or sweet tea is that I always seemed to have sugar grains at the bottom of my glass.  If you use Paula Deen's HOT trick, it won't happen again.

After dissolving the sugar in the hot water, fill the remainder of the pitcher with water.  Stir well.  Here's the COLD part that may sound obvious, but maybe not.  Serve the lemonade over ice.  A lot of ice.  The more ice cold, the better.  Lemonade actually tastes better over ice, even when it is cold.  Garnish with a slice of lemon or a sprig of mint.


Best lemonade ever and a great Southern recipe from Paula Deen.  If my family drinks a couple of gallons a day, we might clear that tree before the fall!


cindy


Sunday, February 5, 2017

Recipe: Chili Verde

While the Super Bowl is over, I have to share a great recipe we love, especially in winter.  This recipe is also very low-carb, which is a bonus for me.  It was a big hit for our guests, and even if we didn't appreciate the result of the big game, we enjoyed the chili. 

The trick to this recipe is the use of pork instead of chicken.  Pork stays tender.  Also, note that depending on the brand of green chile you use, your chili may be more or less spicy.  That's why at the end of the instructions it describes the use of the jalapenos or hot sauce as optional.
Chili Verde
2 lbs pork, cubed
1 cup onion, chopped
14 oz chicken broth
1 1/2 tsp. granulated garlic
2 1/2 Tbl. chicken base
1 tsp celery salt
1 Tbl. cornstarch
1/2 tsp. oregano
1 Tbl. cumin
1/2 Tbl jalapeno
1 Tbl. Dried cilantro
1/2 Tbl. red chili powder
10 oz green enchilada sauce
27 oz green chile, chopped
8 oz green chile, pureed
1 tsp salt

Brown pork and drain.  Add onion and chicken broth.  Simmer 1 hour, stirring often.  Add spices and a little water.  Simmer another hour, stirring often to avoid sticking.  Add green enchilada sauce, simmer 1/2 hour.  Add chopped green chiles.  Cook for 15 minutes.  Add 8 oz pureed green chile.  Use jalapeno, salt or hot sauce to taste.

This stuff is so good!


Cindy

Sunday, January 15, 2017

Who Knew You Can Do? Lemons!

It's January in Arizona - citrus time!  I have this great lemon tree that produces far more lemons than I can use, so I've been working on maximizing my use of the lemons for the past couple of years. After all, you can only make so much lemonade regardless of how many lemons life gives you!  Even if you don't have a lemon tree, this is a good time to find inexpensive citrus at the grocery store. 


I'm going to try/demonstrate a few of these (some of these are obvious) and maybe a few new ones, so keep an eye out this week.  Here is my short list of things to do with lemons:

1.  Freeze them.  You can freeze whole or in slices or just the juice.  The only caveat is that they will be mushy when you thaw them, but the juice is just fine.

2.  Clean wood cutting boards - Use a half of a lemon as a scrub, rubbing the lemon juice on the cutting board along with some kosher or sea salt.  Cleans, kills bacteria and smells great.

3.  Clean your microwave - Cut up, put in a microwave safe dish (I use Pyrex) with water and heat in the microwave for 5 minutes.  The mess in your microwave with just wipe right off!

4.  Freshen your garbage disposal - Cut up lemons into bite size hunks (including rind) and throw in the garbage disposal. It will deodorize and smell great.  If you need to clean it a little more, include some baking soda, squeeze out the juice and let it sit in the disposal for a couple of minutes before you turn it on.

5.  Air freshener in the kitchen - Throw a few cut up lemons in a pot of boiling water with cinnamon and whole cloves and then let it simmer - smells great!

6.  Make a facial scrub - This one I am anxious to try, but while you're waiting for my blog post, here is a recipe from Hot Beauty Health.

9.  Make Limoncello - I'm intimidated by this one, so you might not see a blog post on this for about a month or so.  In the meantime, here is a quick recipe from Food Network

10.  Lemon Squares/Bars - Here is my favorite recipe so far.

Finally, I didn't leave room in my top 10 for lemonade, but I'll make sure to include my favorite recipe in another post.  Obviously, there are so many ways to use lemon in cooking so I didn't include any recipes, but remember - those frozen lemons can help you with those recipes all through the year.

cindy


Sunday, November 20, 2016

Sausage Apple and Cranberry Stuffing

I love finding recipes with beautiful photos and descriptions that make you salivate before you can finish the instructions.  This recipe is the perfect stuffing for Thanksgiving or Christmas.  Unfortunately, I have no gorgeous photos to make you salivate.  I scrounged up a few just to make it interesting.  Seriously, this stuffing is the bomb.

Ingredients:
3 3/4 cups of cubed white bread
1 1/2 cups of cubed whole wheat bread
1 lb ground sausage
1 cup finely chopped onion
1 Golden Delicious apple, cored and chopped
1 cooked turkey liver, finely chopped
3/4 cup chopped celery
3/4 cup dried cranberries
1/3 cup minced fresh parsley
4 Tbl. melted butter
3/4 c. turkey stock
2 1/2 tsp. sage
1 1/2 tsp. rosemary
1/2 tsp thyme
Preheat the oven to 350 degrees.

Bake bread cubes on baking sheet 5-7 minutes.  (I often buy pre-made bread cubes/stuffing)
In large skillet, cook sausage and onions.  
Add celery, sage, rosemary and thyme and cook 2 minutes.
Pour sausage mixture over bread in bowl.  
Mix in apples, cranberries, parsley and liver.
Drizzle with turkey stock and melted butter and mix lightly.
Stuff in turkey or cook in pan until internal temperature is 160 degrees.


Saturday, September 12, 2015

Easy Mexican Crockpot Chicken

I love my crockpot and as a working (outside of the home) mom, I need to use it more.  Here is a recipe I found on Pinterest from RecipeMothers.  I changed it up a little, so here is my version.  It's so easy you won't believe it.

Ingredients:
Boneless, skinless chicken breasts (I made 6, but whatever fits in the bottom of your crockpot)
can of black beans
can of corn (leave the liquid in)
can of Rotel
8 oz block of cream cheese
taco seasoning
ranch dressing mix
rice or tortillas (or both)

I always use a liner in my crockpot because I HATE cleaning it afterwards. Place the chicken breasts on the bottom of the crockpot. Dump the beans, Rotel and the whole can of corn (including the liquid) over the top of the chicken. Because I don't trust my husband to do too much, I put these ingredients in a bowl the night before.


The original recipe called for Fiesta Ranch dressing mix, but I couldn't find it so I improvised.  I used a taco seasoning and ranch dressing and mixed them together.  I used most of both packets because I had 6 chicken breasts, but use your best judgment as to the amount of seasoning you want. Dump it on the top of the vegetables.  Finally, place the block of cream cheese on the top.  No need to chop it up (unless you really want to).


Turn the crockpot on low for 6 hours.  Some versions of this recipe use chicken that is still frozen, so in that case I would plan on 8 hours. It would probably work well if everyone is out of the house all day. If you have a husband who forgets to turn the crockpot on at the right time, it will still work in 4 hours on high.

When it is done, stir so the cream cheese gets spread throughout.  Pull out each chicken breast, cut it up and return it to the pot.  You will probably be able to shred it with a fork - it is so tender!  Serve over rice or use in tortillas.  We did both.  The rice thickens it really nicely so it isn't runny in the tortilla.  My kids loved this and they are not generally an easy sell. 


Enjoy!

cindy


Tuesday, July 8, 2014

Butter Tomato Sauce

It's summer and so many people are buried in homegrown tomatoes.  I miss those big beefy tomatoes from the Midwest, but love the Roma tomatoes we get from Yuma and California.  A couple of months ago I acquired pounds (I don't even know how many) of Roma tomatoes and thought I would try some homemade tomato sauce.  I found this recipe for tomato sauce made with butter and after reading the reviews, I gave it a try.

Before making the sauce I had to peel the Roma tomatoes.  (Some people don't peel Roma tomatoes to make sauce, but I wanted to give this technique a try.)  First, score the ends of the tomatoes like this:

 
Place the tomatoes in a pot of water and heat to boiling.  Watch for the skins to slightly peel back and immediately remove the tomatoes to a bowl of ice cold water.  Leave them in the cold water for a minute or two and remove them to dry.  You've just blanched your tomatoes.


See how the ends look a little bulgy?  You are ready to peel.  Carefully pull back the peel at the places where you scored the tomatoes.  If you get stuck, score them again anywhere on the peel and pull back the skin.

 
After your tomatoes are peeled, cut them up a bit or blend them if you really like smooth sauce.  Following the recipe I linked above, combine 2 pounds of fresh tomatoes with a peeled sweet onion cut in half. (Yes, you just float that onion in the pot with the tomatoes.)  Add 5 tablespoons of butter.
 
 
Cook it over medium heat until the tomatoes are reduced and not so watery and the butter is melted.  You won't be able to resist tasting it after the first couple of minutes and you won't believe how rich it tastes!  I added some chopped green and red peppers and minced garlic that was sautéed in a little olive oil.


At the end, remove the onion and you are ready to go!  It is so good and also freezes very well in Ziploc freezer bags.  Your family will love it, although you might not want to tell your older children there is butter in it because they tend to freak out over "weird" food combinations.
 
Enjoy those summer tomatoes!
 
cindy

Monday, March 31, 2014

Rich Folks Pasta

After more than a month of radio silence, I'm back with a great recipe I collected a while back but never had the courage to try.  It was much easier than I expected, and wow - the payoff was awesome.  This is a great pasta recipe for a dinner party, pot luck or just the family with lots of yummy leftovers.


The original title of the recipe as I received it from an old friend was "Sausage Pasta With Tomatoes & Spinach."  Hmm - boring.  I named it more for how it tastes - rich.

Ingredients:
1 lb sweet Italian sausage (casing removed).  You can get your grocery store meat counter to do this, or you can snip the end and slice the side of a sausage and squeeze it out.
1 medium onion
3 large garlic cloves
1 28 oz can iced whole tomatoes
1/4 prepared pesto sauce
10 oz rigatoni or penne
1 c. Romano cheese
8 c. spinach leaves (2/3 of 10 oz package)
6 oz mozzarella cheese - chopped
6 oz mozzarella cheese - shred
1 pint heavy whipping cream

Preheat oven to 375 degrees.  Cook pasta to "al dente" (not too long or it will be mushy after baking).
In a large saucepan, brown onion, sausage and garlic about 10 minutes.  Add tomatoes with juices.  Simmer until thicker - about 10 minutes.  Stir in pesto and cream and season with salt and pepper to taste.


Oil a 9 x 13" baking dish.  Mixed cooked pasta, raw spinach, chopped mozzarella and 1/3 cup Romano cheese.  Stir in the hot sauce.  Mix and transfer to baking dish.  Sprinkle remaining Romano cheese and shredded mozzarella.  It should look like this:


Cover and bake for 30 minutes.  You will need to let this cool before you can serve it.  You also may want to serve small portions - it is rich.  You'll notice that the combination of the tomatoes, heavy cream and pesto taste a bit like a vodka sauce, but you will be happy you didn't take shortcuts.

Garnish with parsley and enjoy!

cindy

Wednesday, November 20, 2013

The BEST Pumpkin Bars Ever!

It's Pumpkin Palooza week and here is a recipe that lives up to its name.

The BEST Pumpkin Bars Ever


No kidding - these are the ones!  I don't know if I ever tasted a pumpkin "bar", but these things are the bomb!  I can't take credit for any part of this - not the title, the recipe or the awesomeness, but I do want to introduce you to one of the most fabulous pumpkin things I have ever eaten.


I found this recipe through a beautiful photograph on Pinterest.  That led me to Mique at 30 Handmade Days and her great recipe.  Click through the link to her post and the recipe; it's written out in a way you can print it or save it.

These bars are definitely not for those on a diet - they are made with oil, eggs, sugar, pumpkin and a few other ingredients.  They have a consistency almost like a moist brownie.  The frosting is a homemade cream cheese frosting (which I plan to use on many more recipes).  They can be baked in a shallow pan like a cookie sheet.  I chose to use a 9 x 13" pan, so mine are deeper and denser.


The taste?  You can eat them cold, or better yet, warmed with the frosting melting slightly.  When they're cold, they taste like a wedge of pumpkin pie, but with a firmer consistency.  When they are warmed up, they melt in your mouth.  They stay firm and moist, even after a couple of days.  We stored them open in the refrigerator and cut them as we ate them, and they never dried out.


These pumpkin bars passed the picky test with my kids and husband, which is impressive for a pumpkin dish.  This recipe is definitely a keeper and one I plan to pull out for a party this weekend.

Yum!

cindy

Tuesday, November 5, 2013

Try It Tuesday - Overnight Oatmeal

Here's another one of those recipes you see on Facebook.  This one looked so yummy, there was no way to resist.  It doesn't hurt that I love oatmeal and don't get to eat it much.  And if that isn't enough - it's in the crockpot so there is no work!!  'Nuf said - here we go.

Place in your crockpot (in this order):

2 sliced apples (I used a sweet apple like a Gala or Honey Crisp)


1/4 c. brown sugar
1 tsp. cinnamon
Pinch of salt
2 c. of oatmeal
2 c. milk
2 c. water


DO NOT STIR!

Cook overnight, about 8 hours on low heat.  (My old crockpot runs really hot, so I only did it about 5 hours).

In the morning, give it a good stir and add a little more milk if needed.  This stuff was awesome and I'm keeping this recipe!


cindy


Tuesday, October 29, 2013

Try It Tuesday - Butter-Flavored Brickle Drizzles

Recently, my daughter-who-no-longer-wants-to-be-mentioned-by-name brought home an old cookbook, "365 Favorite Brand Name Cookie Recipes."  In the spirit of autumn, we chose recipe #95, Butter-Flavored Brickle Drizzles.  It wasn't clear when this cookbook was written, but I would guess the 1980s.  There's no gluten-free, fat-free, "healthy" ingredients involved here.  I am writing the recipe exactly as it appears in the book, including references to things like "shortening"

Ingredients:

1 BUTTER FLAVOR CRISCO Stick or
1 cup BUTTER FLAVOR CRISCO all-vegetable shortening (this was the brand name part)
1 cup granulated sugar
1 cup firmly packed brown sugar
1 14 ounce can sweetened condensed milk (not evaporated milk)
1 teaspoon vanilla
1 3/4 cups all-purpose flour
1 teaspoon salt
1/2 teaspoon baking soda
3 cups quick-cooking oats uncooked
1 cup almond brickle chips (Heath Bar chips)

Drizzle:  1 cup milk chocolate chips

Preheat oven to 350 degrees and grease cookie sheet with shortening

Combine shortening, granulated sugar and brown sugar in large bowl.  Stir until well blended and creamy.  Stir in condensed milk and vanilla.  Mix well.

Combine flour, salt and baking soda in a separate bowl.  Stir into creamed mixture and stir in oats.

Shape dough into 1" balls.  Press tops into brickle chips.  Place, brickle side up on cookie sheet, 2" apart

Bake for 9-10 minutes until set but not brownd.  Remove to wire rack and cool.

For drizzle, place chocolate chips in resealable ziploc bag.  Microwave at medium (50%).  Knead bag after 1 minute.  Repeat until smooth.  (You can also do this by dipping the bag into hot water until the chocolate melts).  Cut tip of plastic bag and squeeze out chocolate in drizzles on the cookies.

These are really tasty cookies.  They are thin and crunchy and the combination of oatmeal and brickle chips reminds me of cold autumn days with the sweetness of pralines.  We didn't get to the drizzle, but they were good without them too.


A crunchy treat on an autumn kinda day.

cindy


Wednesday, December 19, 2012

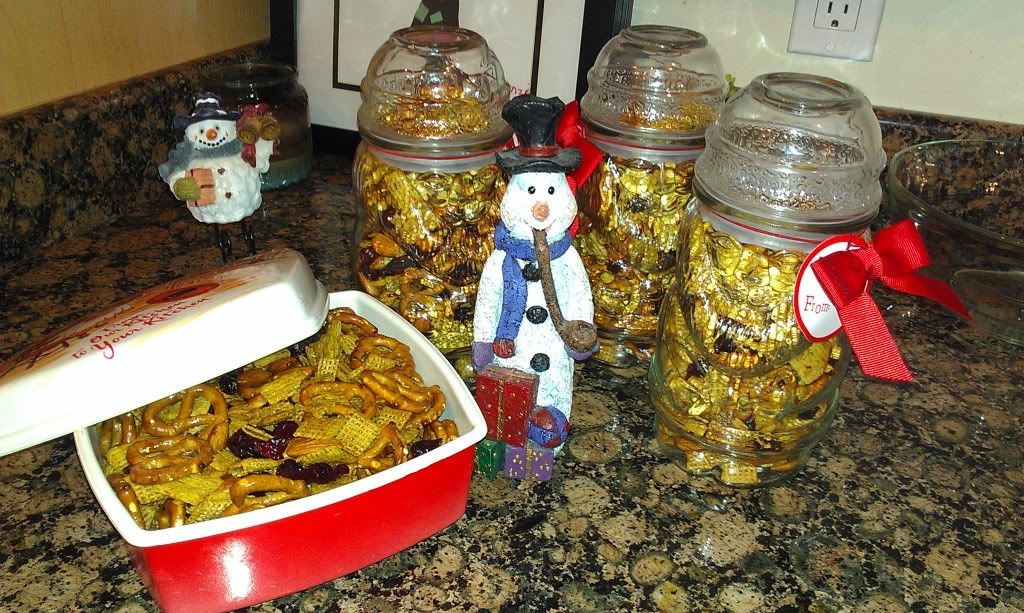
Recipe - Cranberry-Orange Snack Mix


This is a repeat from last year - not only in posting this recipe, but also because it might be last minute gifts again this year.

It's getting down to the wire when I've got to think about all the "little" gifts I need - for teachers, babysitters, mailmen, other last minute recipients.  These are my favorite gifts because although I like to make them interesting, I don't necessarily have to give a lot of personal thought to them.  I also like to combine my love for the deal.  Specifically, I like to buy Christmas things right after Christmas for a song and wait and use them the following year.  When I unwrap my Christmas decorations, I enjoy finding something new - like Christmas comes early.  Last year I found these glass Santa containers on sale for $1.00 each (originally $4.99) at Target.  I thought I would make cookie mix, but because of the small size, I needed to think of something else.

 Cranberry/Orange Snack Mix


The ingredients are pretty simple:

2 c. Corn Chex
2 c. Oat squares
2 c. Mini Pretzels
1 c. whole almonds
1/4 c. butter
1/3 c. frozen orange juice concentrate, thawed
3 Tbl packed brown sugar
1 tsp ground cinnamon
3/4 tsp ground ginger
1/4 tsp allspice
2/3 c. dried cranberries (Craisins)

Preheat oven to 250 degrees and coat a 13X9 inch baking pan with non-stick cooking spray.  Mix the first four ingredients in a large bowl and set aside.  In a smaller bowl melt butter and add orange juice concentrate, brown sugar and spices.  Mix well and pour over the dry ingredients, stirring them to coat. 


 Spread the resulting mix on the baking pan and bake for 50 minutes.  You will need to stir the mix every 10 minutes.  


Once it's done, you add the Craisins and lay the mix out on a flat surface until it's dry.  You can store it in any airtight container.  As an extra bonus, your kitchen will have a wonderful smell of spiced orange and cranberry.  


This is better than any old cookie mix :)

cindy